Article still in progress, but already online due to high demand.
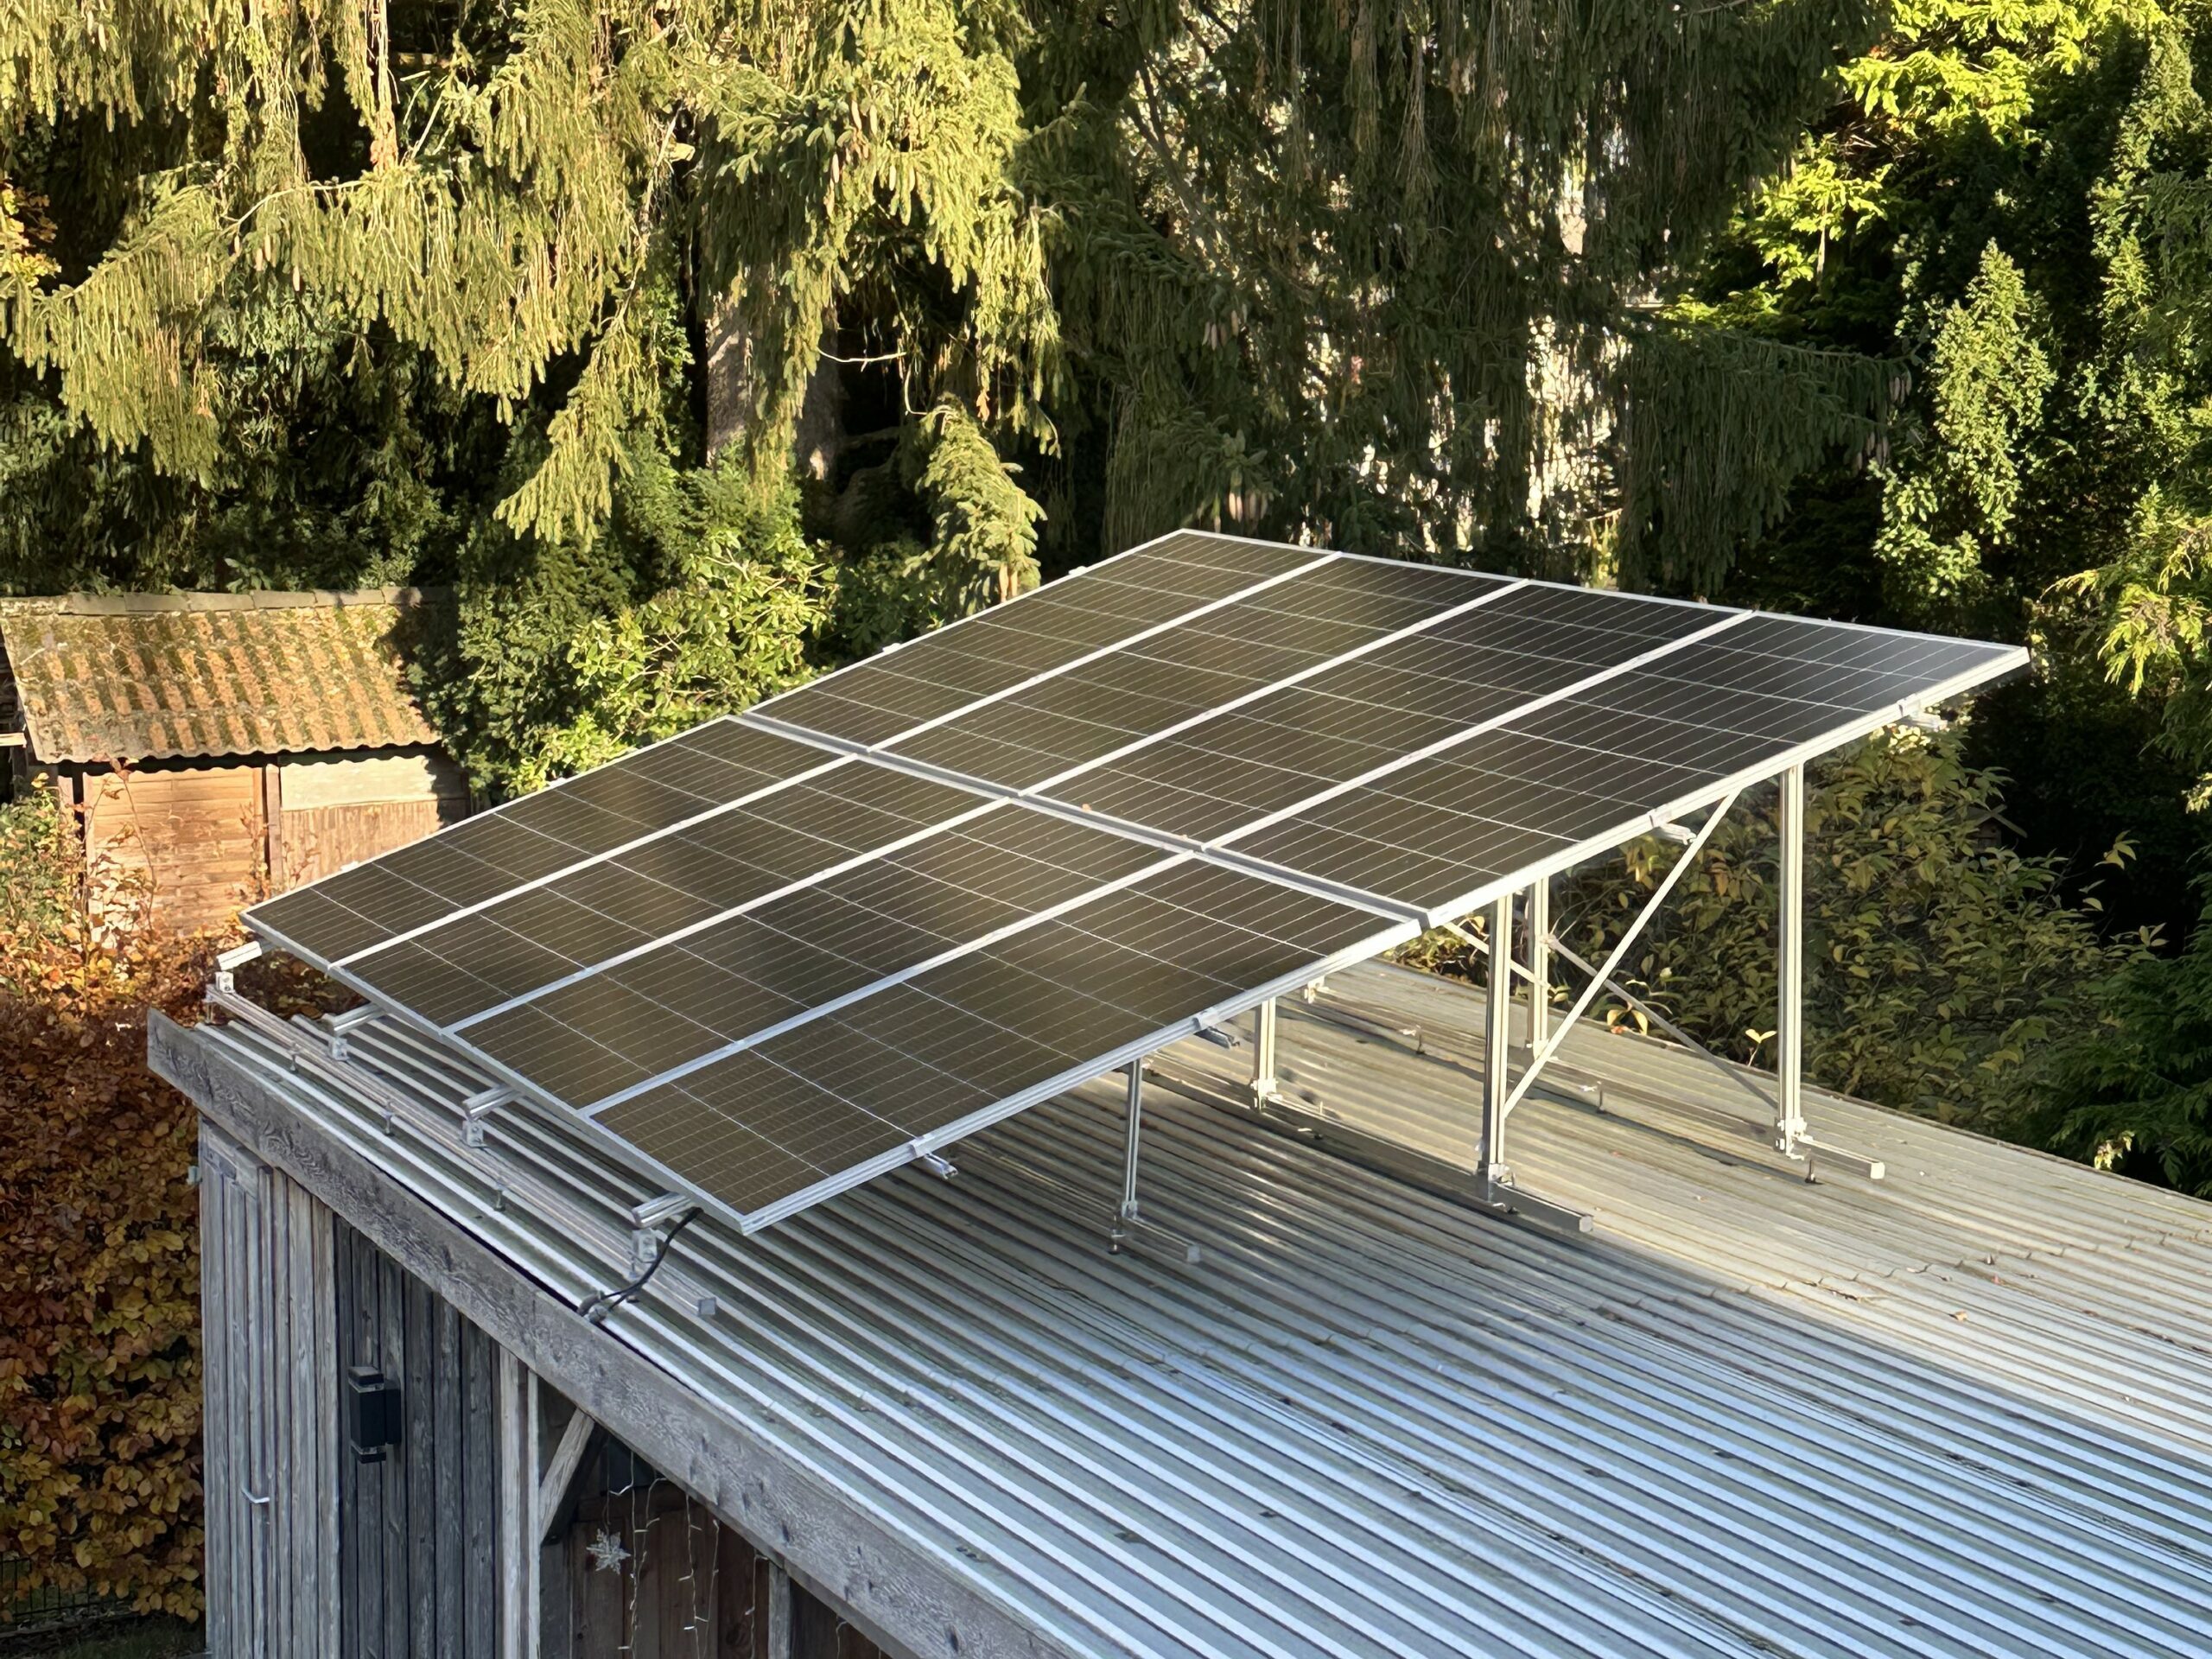
Components of the PV carport elevation
Substructure: Anchoring to the corrugated sheet metal carport roof
The first section deals with the substructure, which is directly connected to the carport: As a basis for the later supports of the elevation, I have four Schletter Solo profiles (40×40) with (as many as possible) K2 hanger bolts to the carport roof. The Solo profiles have an M8 groove and an M10 groove. In my case, the M8 groove is at the bottom and the M10 groove is at the top. At the bottom I can therefore use M8 screws, M8 nuts (then lie in the M8 groove of the Solo profile), M8 washers and M8 spring washers Connect the support plates of the hanger bolts to the Solo modules.
| Quantity | Article | Description |
|---|---|---|
| 20 | K2 Systems hanger bolt 2000120 | The anchoring of the elevation is probably the weak point of the construction. I therefore recommend using as many hanger bolts as possible. I used five hanger bolts per solo profile (the carport does not allow for more due to the limited number of beams), so a total of 20 weak points in the structure. as many hanger bolts as possible. Installation tip: Drill according to the Instructions with a 14 mm metal drill bit (corrugated sheet metal or fiber cement profile) and a 7 mm wood drill bit (carport beams). For easier insertion of the hanger bolts, dip them in any oil. |
| 4 | Schletter Solar module support profile Solo 120005-04750 | Several lengths and colors of the Schletter Solo series are available. You can order these individually or, if in doubt, separate them using Flex. With an optional Connector you can extend existing profiles; however, make sure that the extension is not in the way of (later) other mounting elements. For my PV system, I used four Solo profiles for the lower level of the elevation (additional Solo profiles for the elevation). |
| 1 (100 pieces) | Schletter Solar square nut M8 943914-008 | The M8 nut can be inserted into the M8 groove of the Solo profiles (even retrospectively). |
| 20 | Schletter Solar hexagon socket screw M8x20VA 943308-120 | The thread of the M8 screw engages in the M8 nut inserted in the Solo profile. The screw (supported by spring washers and washers) holds the support plate of the hanger bolts and the Solo profiles together. |
| 1 (100 pieces) | Washers DIN9021 M8 stainless steel V2A (Reinartz) | If the screw heads are too small (insufficient contact surface), I recommend using washers. |
| 1 (100 pieces) | Spring washers DIN127 M8 (form B) stainless steel V2A (Reinartz) | For a long-term, secure hold, I always recommend the use of spring washers, which can be purchased here at a bargain price. |
Elevation
supports and profiles on which the pv panels rest
| Quantity | Article | Description |
|---|---|---|
| 4 | Angle (AliExpress) | Excellent quality and fits perfectly on the 40×40 profiles (Schletter Solo). I threw away the original screws and used M10 screws and M10 nuts instead (see below) to attach the brackets to the profile. To do this, I had to enlarge the two side holes with a 10.5mm metal drill. I also enlarged the hole in the movable plate with a 10.5 mm metal drill bit to attach the elevation later. I have also used some of the brackets to attach the elevation to the supports (see photos). This is possible without any problems, but provides less stability than the direct use of 40×40 perforated plate angles. |
| Schletter Solar module support profile Solo 120005-04750 | As with the substructure, I used Solo profiles for the elevation. I connected these to the Angles from AliExpress and suitably cut supports (also with Solo profiles) at an angle of approx. 20°-25°. The same applies here: Order suitable lengths of Solo profiles and saw (flex) them to size accordingly. The Solo profiles of the elevation are attached so that the M10 groove points downwards and the M8 groove points upwards. The M10 groove of the Solo profiles of the substructure points upwards (below, we have attached these to the hanger bolts using M8 screws), so that two M10 grooves are now facing each other. This is particularly relevant for the supports (see below). Later, the PV panels will not lie directly on the Solo profiles, but on (very inexpensive) Schletter EcoLight profileswhich form a grid with the Solo profiles. More on this later. | |
| 5 (10 pieces each) | Perforated plate bracket 40 x 40 x 40 mm hot-dip galvanized steel (Reinartz) | I achieved the best results by using perforated plate brackets to attach the supports between the substructure and the elevation: The Solo profiles can be connected to each other in this way using clever drill holes on the perforated plate brackets, precise measurements and a little skill. The fact that the perforated panel brackets are 40 mm wide, i.e. exactly the same size as the Solo profiles, is particularly practical. This means that two perforated panel angles can be joined together in a U-shape, with the base of the U is double. In the double U-Both angles are now drilled with a 10.5 mm metal drill bit. exact in the middle so that they can now be attached to the M10 groove of the Solo profiles (substructure, elevation). The left side of the U is now drilled through with a 10.5mm metal drill, the right side of the U with an 8.5 mm metal drill. This means that the Solo profiles (M8 groove and M10 groove) can now be attached to the brackets in the usual way. It is advisable to really exact work so that the brackets fit later. After all the holes have been drilled, the brackets should first be attached to the M10 groove (substructure, elevation); the support should then be inserted. Instead of the perforated plate brackets, there is also the option of using additional Angles from AliExpress (and other constructions). This is how I initially did it for the top two rows of supports. It turned out that the angles (naturally) have a certain amount of play and this affects the stability. |
| Schletter Solar square-head bolt M10x25,VA 943410-025 | The M10 screws are required to attach the perforated plate brackets to the Solo profiles. | |
| Schletter Solar flange nut M10 V4A 943912-010 | Counterpart to the screws. | |
| 1 (100 pieces) | Spring washers DIN127 M10 (form B) stainless steel V2A (Reinartz) | For a long-term hold. |
| 1 (50 pieces) | Washers DIN9021 M10 stainless steel V2A (Reinartz) | May be required to tighten screws properly. |
| 4 | Schletter Solar module support profile EcoLight 120011-05500 | As already mentioned, the PV panels do not lie directly on the Solo profiles, but on EcoLight profiles. These are less stable, but comparatively very inexpensive and offer a great opportunity to create a grid, i.e. at a 90° angle to the elevated Solo profiles. Here too, the number and length are individual. |
| 16 | Schletter Solar cross connector Rapid 129063-000 | The cross connector is particularly suitable for connecting the Solo profiles (M8 groove at the top) and the EcoLight profiles (M10 groove at the bottom). When ordering, make sure that you do not confuse the Rapid series with the Rapid16 or RapidPro series, which do not fit in this case. |
Stabilization, cable routing and accessories
necessary accessories
| Quantity | Article | Description |
|---|---|---|
| bauhaus aluminum strips | Cross bracing in both directions (right-left, front-back). Fasten the aluminum slats using 40x40x40 perforated plate brackets (holes for M8/M10 screws must be drilled depending on the profile side). | |
| 16 | Schletter Solar plastic end cap 129011-000 | End caps for all 40×40 profiles (Schletter Solo) |
| 2 | DEHN Uni earthing terminal UEK810AQ450HKSM10V2A | I have connected the earthing cables in two places to make sure that everything is earthed |
| 1 | DEHN terminal block TG/tZn AK410FRM10X #371008 | Earthing of corrugated sheet metal roof / carport |
| 10 | HIS Renewables MC4 plug 4-6mm² 708668 | Female connector part. Corresponds to the number of modules plus DC disconnector, DC overvoltage protection, inverter and any string extensions. |
| 10 | HIS Renewables MC4 socket 4-6mm² 708669 | Male connector part. Corresponds to the number of modules plus DC disconnector, DC overvoltage protection, inverter and any string extensions. |
| 1 | MC4 crimping pliers (Amazon) | Please use a dedicated MC4 crimping tool. Anything else is life-threatening! |
| MC4 tool wrench (Amazon) | Practical tool for closing and opening MC4 plug connections. | |
| 30 | Schletter Solar cable clip Multi 8 129065-008 | Fastenings for PV cables. Make sure that the cables do not rub anywhere in the wind and that they are in the best possible contact with the profiles (especially the MC4 connectors) to prevent short circuits caused by water. I have calculated with 3 clips per PV module, plus a few clips for additional cabling. |
| N/A | KBE solar cable 6 mm² black DB+ H1Z2Z2-K Photovoltaic solar cable (cable barn) | Typical cable diameter, which is usually sufficient. Individual cable length. I have buried the cables in a cable conduit 1+ meters underground. A Warning tape for cables. |
| 1 | DC disconnector Solar changeover switch Disconnector 4-pole 32A 1000V (Amazon) | Isolating switch for mounting between PV modules and inverter as an additional disconnection device. It is mounted on my carport so that the PV current can be cut here in the event of a fire in the house and I don't have to rush to the inverter in the basement. |
| Earthing cable | connection to equipotential bonding bar in the house | |
| 1 | DEHN Surge arrester DCU YPV SCI 1000 1M | |


Leave a Reply