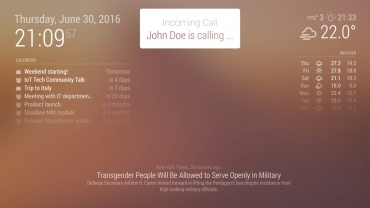
It has already been three quarters of a year since my last post the Magic Mirror series I announced a change of course from in-house development on Universal Windows Platform and Windows 10 IoT Core to a web-based application. Today is the day, because I have decided to continue the project MagicMirror² a project that is backed by a large community. This article describes the procedure and installation.
Foreword
So my decision is made and for my Magic Mirror I will use the Node.js-based community solution MagicMirror² use. If you are not yet familiar with the project, I recommend the following Promotion video which explains the basic design and functionality briefly and concisely, but clearly and precisely. The project was created by the Dutchman Michael Teeuw.
The following instructions are largely based on instructions from the community, which I would like to share with you here:
Should any errors occur, this is therefore a good first port of call.
Please follow the instructions chronologicalto carry out all the necessary steps.
These Guidance is based on some assumptions:
- You do not (initially) connect to the Raspberry Pi using wireless technology, but rather via a cable (connected directly to the Raspberry Pi using a mouse and keyboard).
- You are using Microsoft Windows 10 as the operating system on your computer.
Preparations
Downloading Raspbian
The project is based on Raspbian - probably the most common operating system for the Raspberry Pi. Here you must first install the Download image.
Use the Download the ZIP filewhich you can easily unpack afterwards.
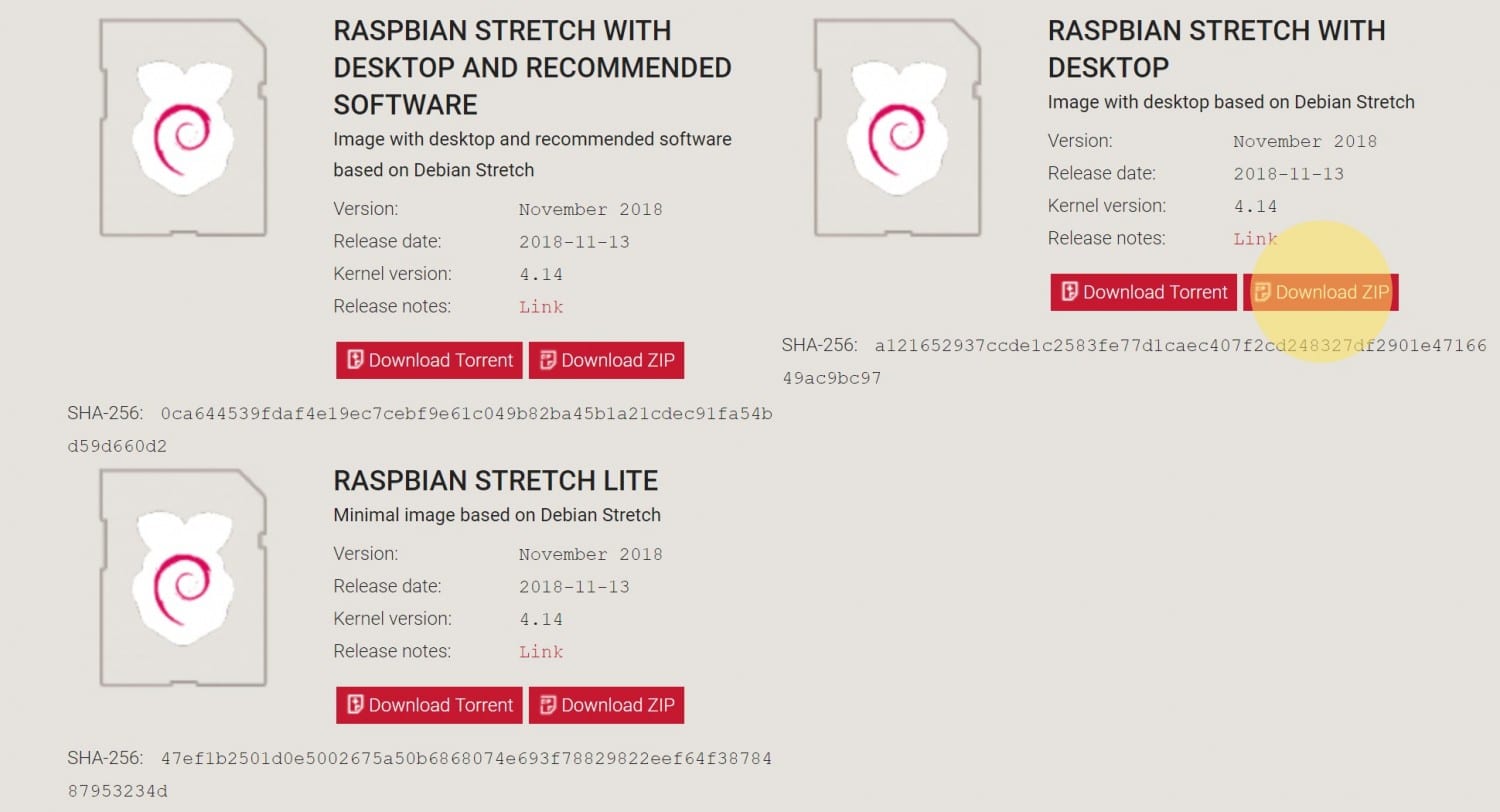
Depending on your internet speed, the download may take a little while. Once it is complete, you can right-click on Extract all click to open the ZIP archive to unpack.
Formatting the MicroSD card
Now guide your MicroSD card into your card reader on your Windows PC in order to use this prepare for installation. This works best with the SD Card Formatterwhich you can download free of charge:
Now start the SD Card Formatter and select the inserted MicroSD card. But Attention:
- Make sure that you have the Correct MicroSD card you have chosen!
- All data on the MicroSD card at this point will be permanently deleted after the preparations (formatting). If in doubt, create a Backup copy of the data!
When you start the SD Card Formatter, select the following settings, whereby G:\ in my case may differ from your drive letter of your MicroSD card!
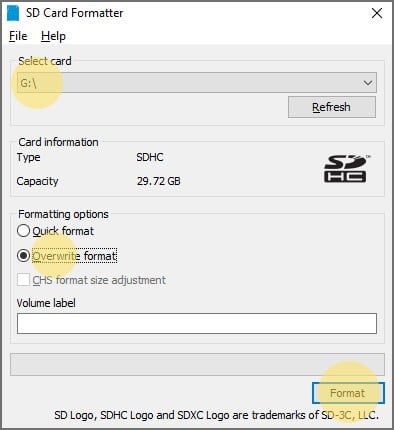
After clicking on Format you will receive a warning message informing you that all data on the MicroSD card will be deleted. You can and must delete this with Yes confirm.
Depending on the storage capacity and speed of the MicroSD card, the Process may take a few minutes.
Installation
Installation of Raspbian
After you have completely formatted the MicroSD card, we can now start installing Raspbian. For this you need the Win32 Disk Managerwhich you can download here free of charge:
After installing the Win32 Disk Manager please start it with administrator rights (run as administrator). You can do this by right-clicking on the program.
Now proceed as follows:
- Now first select the Image file from Raspbian - i.e. the extracted file from the ZIP archive that we downloaded at the beginning.
- Now select the same data carrier that you have already selected in the SD Card Formatter to format the MicroSD card. Here too, the drive letter [G:\] can certainly be different for you.
- With one click on Writing Raspbian is installed on the MicroSD card.
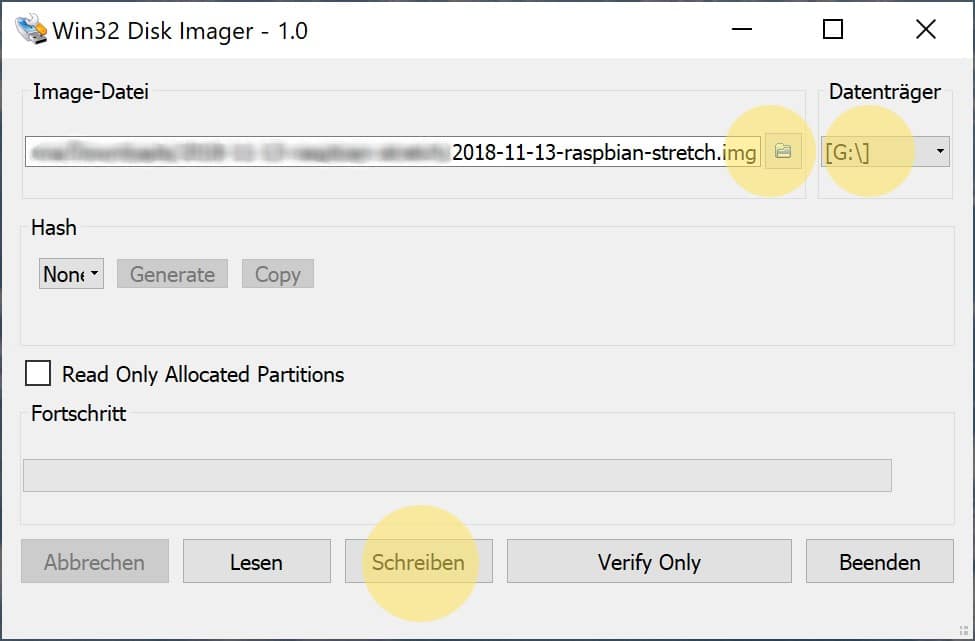
At this point, we also receive a warning message stating that data may be overwritten (however, there is currently no data on the MicroSD card because we formatted it beforehand). We also confirm this with Yesto continue with the process.
Safe removal of the MicroSD card
Last but not least, you should Safely remove MicroSD card - a Windows functionality to prevent data loss. Alternatively, you can shut down your computer completely and then remove the MicroSD card from the card reader.
Starting and configuring Raspbian
Now the The time has come when you can insert your MicroSD card into your Raspberry Pi. At this point, also make sure that the following Hardware components are connected to the Raspberry Pi:
- W-LAN adapter (if necessary)
- Mouse
- Keyboard
- Monitor
- Power supply unit
Then start the Raspberry Pi.
At the top left, after a successful start, the Terminal window (console)with the help of which you can Call up graphical configuration can:
sudo raspi-configAfter entering the command, press Enter. The Navigation in the opened window works with the Arrow keys and the Tab key.
The task now is Some settings to be carried out:
- The created Partition (section of the MicroSD card that can be used) does not currently correspond to the full storage capacity of the MicroSD card. We want to change this so that we can install and configure MagicMirror² and use the Use the entire storage space of the MicroSD card can. Depending on the Raspbian version, the first level or the menu item Advanced Options the possibility Expand Filesystem. Select this and follow the instructions. A direct restart is recommended, but not yet necessary at this point.
- The menu item Internationalization Options enables the correct setting of Time and language:
- In the submenu Change Locale you have the possibility to Display language to change. If you decide to do this, a language data set in UTF-8 format is recommended so that all necessary characters are supported. I normally recommend keeping the English language.
- The submenu Change Timezone you should definitely pay attention to and, if necessary, adjust in order to ensure the correct Time zone and therefore also Time to receive.
- So that you can easily press the buttons on a Use the German keyboard including umlauts it is worth taking a look at the submenu Change Keybord Layout. Select the right layout for your country here.
- The lowest menu item Change Wi-fi Country enables you to Correct choice of W-LAN frequencies. Set the country you are in here too.
Now we are ready and can start with the selection of Finish the Restart Raspberry Pi.
The task now is to Connection with the outside world to set up: Connecting to a W-LAN network under Raspbian is not rocket science: There is a W-LAN icon in the top right-hand corner of the menu bar, which should display the W-LAN networks in your area. As known from other operating systems, you can use this to connect your Select your Wi-Fi network and connect.
For possible problems I would like to refer you once again to this external article.
Cleanup and Raspbian updates
Uninstalling unnecessary programs
Along with Raspbian come a few standard programs that are not needed. Detailed instructions on how to remove these can be found at here on. However, this step is not necessary and should be skipped first - especially by less experienced hobbyists.
Updating the software packages
Now it is time to update the installed Raspbian software packages. The following command is used to compare the versions between your installation and the current version (online):
sudo apt-get updateWith the following command you can change the Update software packageswhere a deviation in the version number is found:
sudo apt-get upgradeThe following message (warning) is marked with a Y to confirm.
Depending on the performance of your Raspberri Pi and your MicroSD card as well as your internet connection, the process may take a few minutes. take a few minutes.
Updating the firmware of the Raspberry Pi
As a final element, we can now update the firmware of the Raspberry Pi. This works with the following command:
sudo rpi-updateRestarting the Raspberry Pi
A Restarting the Raspberry Pi is now at the latest necessary to become. You can do this either via the menu bar or you can use the following command for the terminal window:
sudo rebootInstallation of MagicMirror²
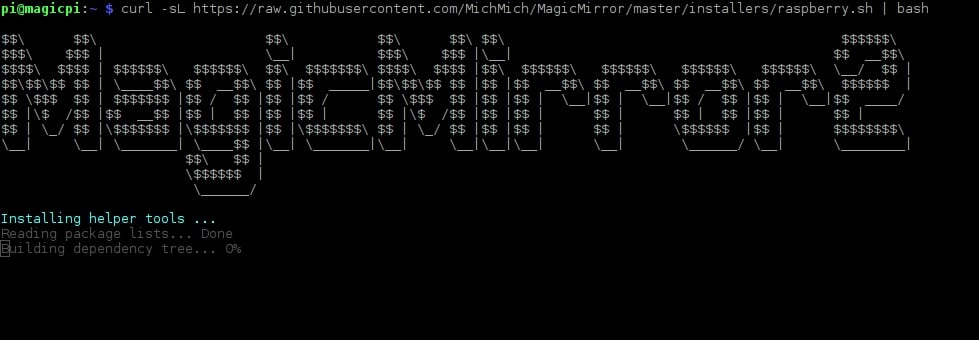
The project MagicMirror² is now a very mature, large community project with many modules and setting options. For some time now, there has also been a summarized script that can be used for the complete installation. To do this, you must first start the terminal window and then enter the following command:
bash -c "$(curl -sL https://raw.githubusercontent.com/sdetweil/MagicMirror_scripts/master/raspberry.sh)"The installation process then starts and looks like this:
Configuration of and for MagicMirror²
Changing the screen orientation
Most of you will probably want to use the Magic Mirror vertically and not horizontally. A global setting for Raspbian allows the display to be rotated. To do this, enter the Terminal window the following command:
sudo nano /boot/config.txtIn the file that opens, you can set the parameter display_rotate now on 1 to initiate the rotation:
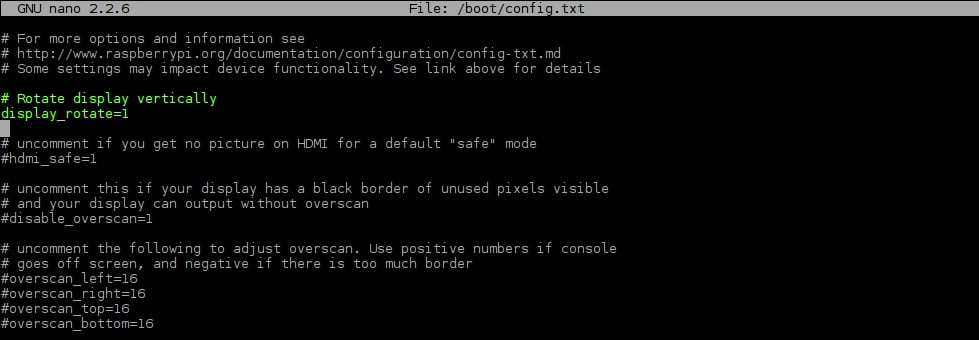
Through Ctrl + X and the subsequent input of Y to save the setting.
Deactivating the screen saver
We would like to offer our Let Magic Mirror run permanently at first - and this also means that the Screen saver not switched on will be. This requires configurations in two places.
The First configuration step is carried out here:
sudo nano /etc/xdg/lxsession/LXDE-pi/autostartNow add the following three lines to the end of the file:
@xset s noblank
@xset s off
@xset -dpms
Also saves these settings using the above key combination of Ctrl + X and following Y.
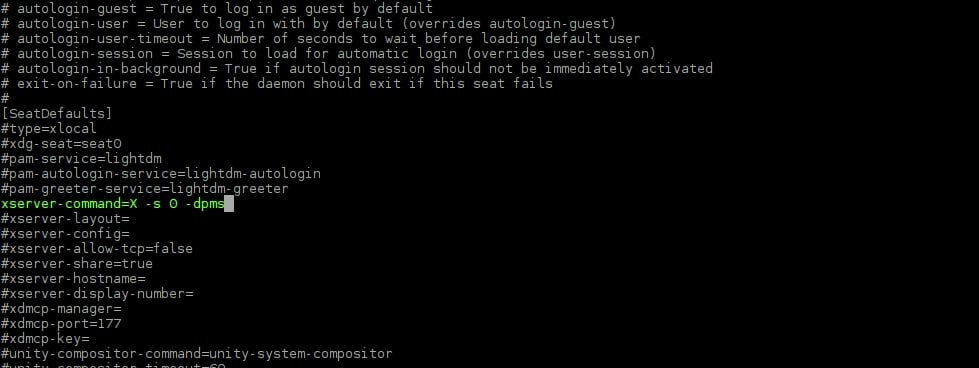
The second configuration step can be made here:
sudo nano /etc/lightdm/lightdm.confIn the section [SetDefaults] there is the line xserver-command. You must modify these as follows:
xserver-command=X -s 0 -dpmThe following is therefore removed # at the beginning and the rest added - exactly as shown in the following screenshot:
Stability through active hardware
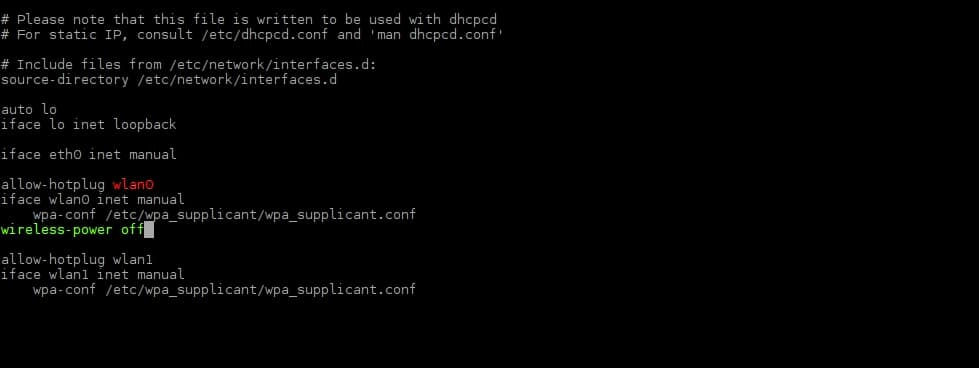
Raspbian automatically switches off hardware to save energythat is not used regularly. This includes also the WiFi driver. This means that regular updates - of the weather, for example - can no longer be carried out reliably. This circumstance can also be eliminated with a simple configuration, which can be started with a Command in the terminal window begins:
sudo nano /etc/network/interfacesIn the window that appears, you must first select the section with wlan0 find. Then add the following line of code at the end of the section:
wireless-power offThe whole thing then looks like this, for example:
A restart is then possible - either via the menu or via the following command:
sudo rebootRemoving the mouse pointer
A small, additional software package helps to remove the mouse pointer after a few seconds of inactivity. To do this, we start the Terminal window:
sudo apt-get install unclutterFine tuning of Raspbian
There are two small things we can still do to optimize the Magic Mirror startup:
- Through a Right-click on the desktop of Raspbian we can use Desktop Preferences to access the general display settings. In the tab Desktop we can now use the Remove background image and a black color. To do this, we change the setting of Layout in No image and ensure that Color is set to a black color. In addition, the Wastebasket which would otherwise remain permanently on the desktop.
- A Right-click on the menu bar takes us to the Panel Settings. Under the tab Appearance we can use the Background now on Solid color (with opacity) so that the menu bar is transparent and thus takes on the hue of the background color.
If necessary after these settings is a Restart necessaryso that they become fully effective!
Creating a configuration file
As a last and final step, we would like to Create a valid configuration file. This is required to configure modules. I will discuss this in the next part of the Magic Mirror series in more detail.
To create it, we first navigate using the Terminal window:
cd MagicMirror/config
cp config.js.sample config.js
Using the file search - similar to Windows Explorer - the config file can also be conveniently accessed in future. You can start the file search by clicking on the folder icon in the Raspbian menu bar.
Now the time has come, Start MagicMirror²! To do this you start a New terminal window and enter the following commands there:
cd MagicMirror
npm start
The Magic Mirror should now start! Have fun with it!
Questions & Answers
There are errors during the installation of MagicMirror². How do I continue?
It is normal that certain software components are sometimes incompatible with each other. There are three possible solutions (from quick to complex):
- Installation of updates for all modules (as described)
- Reinstalling Raspbian without installing any updates
- Reinstallation of an older Raspbian version with/without the installation of any updates
There are errors when updating/upgrading software packages. How do I continue?
It is normal that certain software components are sometimes incompatible with each other. There are three possible solutions (from quick to complex):
- Installation of updates for all modules (as described)
- Reinstalling Raspbian without installing any updates
- Reinstallation of an older Raspbian version with/without the installation of any updates
I can't get any further. Who can help me?
Comments under my articles are always welcome. In addition, the large MagicMirror²-Community gladly!
Leave a Reply to Torsten Cancel reply