Introduction
Wouldn't it be great to just take a photo of a business card and save the extracted information as a new lead record in Microsoft Dynamics 365? Or to add certain elements to an existing lead record? Or maybe the same with contacts or accounts? Let's jump right in and check out how it works!
In this tutorial, I will show you how to cover the two most common cases:
- Case 1: Create a new lead record based on a taken photo of a business card.
- Case 2: Update an existing lead record based on a taken photo of a business card.
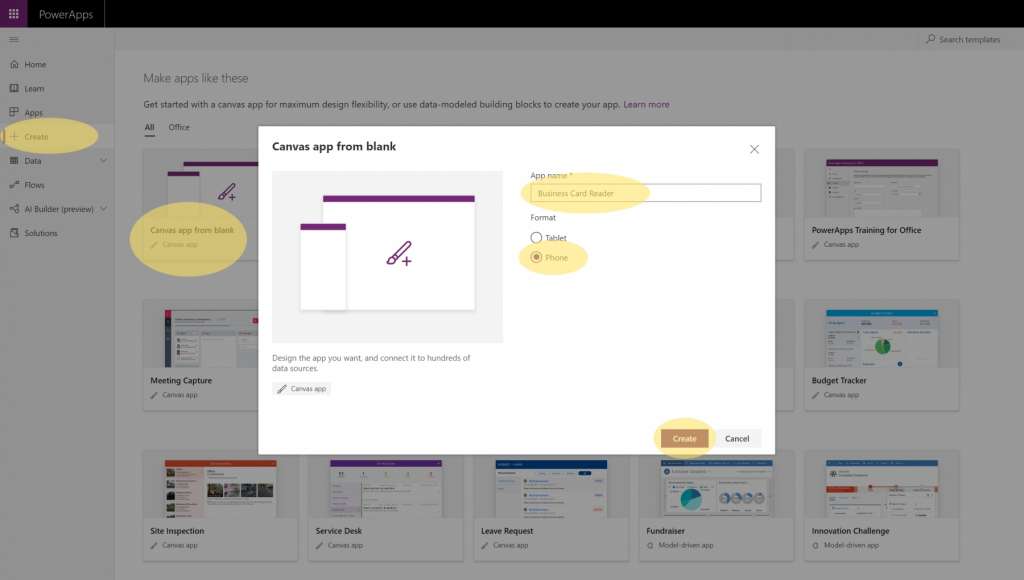
In order to create such an extension for Microsoft Dynamics 365, we need to create an application for it. The best way is to use Microsoft PowerApps as a Low-Code-Platform providing a built-in AI model from the recently announced AI Builder which extracts information from the business card. So let's start with creating a new PowerApp from the PowerApps Portal. In this case, we choose a Canvas app, of course. I recommend choosing the phone layout since that will probably be the app layout for production use later.
Having created the PowerApp, we want to implement two features:
- Create a new lead record based on a Business Card
- Update an existing lead record based on a Business Card
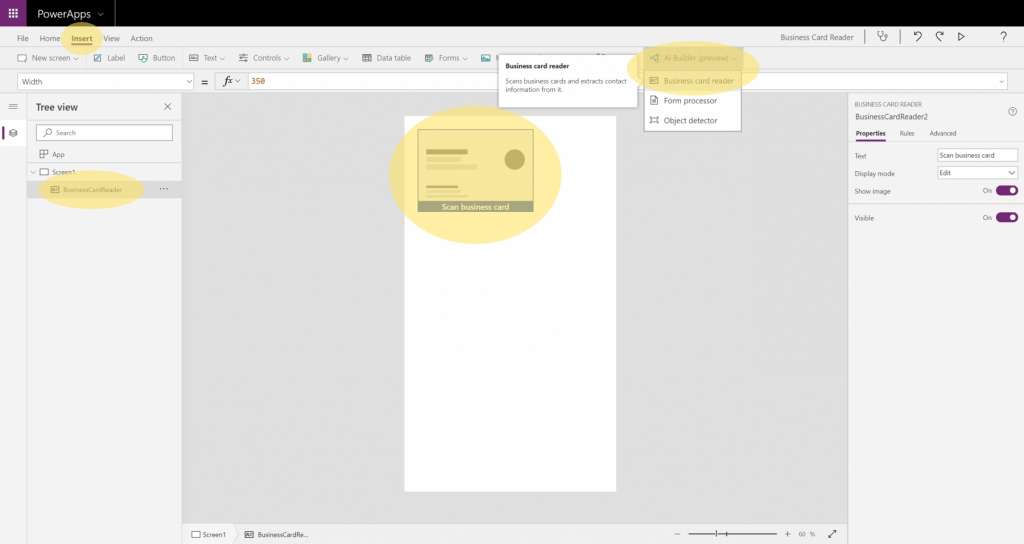
In order to create a single and smooth workflow, we first ask the user to scan the business card so he has the information inside the PowerApp. Later, the user can decide wether to create a new Lead record or update an existing Lead record. Therefore, we insert the Business Card Reader AI Module by navigating to Insert → AI Builder (preview) → Business card reader.
The Business Card Reader AI Module works like this: On a computer, you have the choice to pick a locally saved photo and upload it to PowerApps which is all implemented already by clicking on "Scan business card". Opening the app on a phone or tablet, you also get the option to take a photo directly.
After handing a photo over to PowerApps in either way, it gets analyzed. After a few seconds, the results can be seen in the following properties of the Business Card Reader AI Module (named BusinesCardReader in my case):
| Property | Description |
| CleanedImage | The image after processing where the business card appears cropped and enhanced from the original image. |
| CompanyName | The company name in the business card, if found. |
| Department | The organization department found in the business card, if found. |
| The contact email found in the business card if any. | |
| FirstName | The contact first name in the business card, if found. |
| FullAddress | The contact full address in the business card, if found. |
| FullName | The contact full name in the business card, if found. |
| JobTitle | The contact job title in the business card, if found. |
| LastName | The contact last name in the business card, if found. |
| OriginalImage | The original image before processing. |
| Phone1 | The first phone or fax number detected in the business card, if found. |
| Phone2 | The second phone or fax number detected in the business card, if found. |
| Phone3 | The third phone or fax number detected in the business card, if found. |
| Website | The website detected in the business card, if found. |
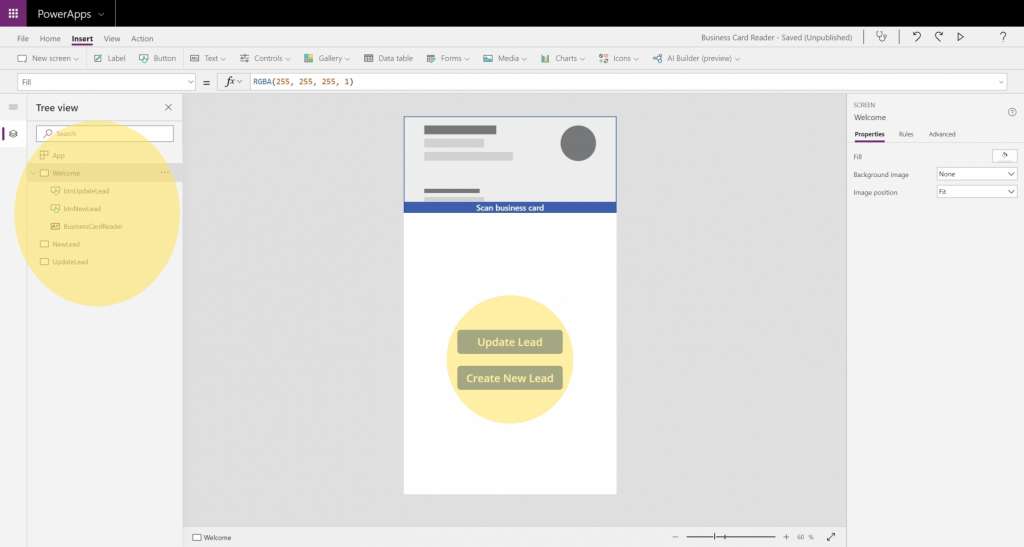
As a next step, let's give the user the chance to choose between the two options. Therfore, I did the following:
- Create two new screens by navigating to Insert → New screen → Blank. One screen is for creating a new lead, one screen is for updating existing leads.
- Create two buttons on the first screen to navigate to the two new screens by using the OnSelect property and the Navigate() function.
Case 1: Creating a new lead record
Let's first handle the case to create a new lead record.
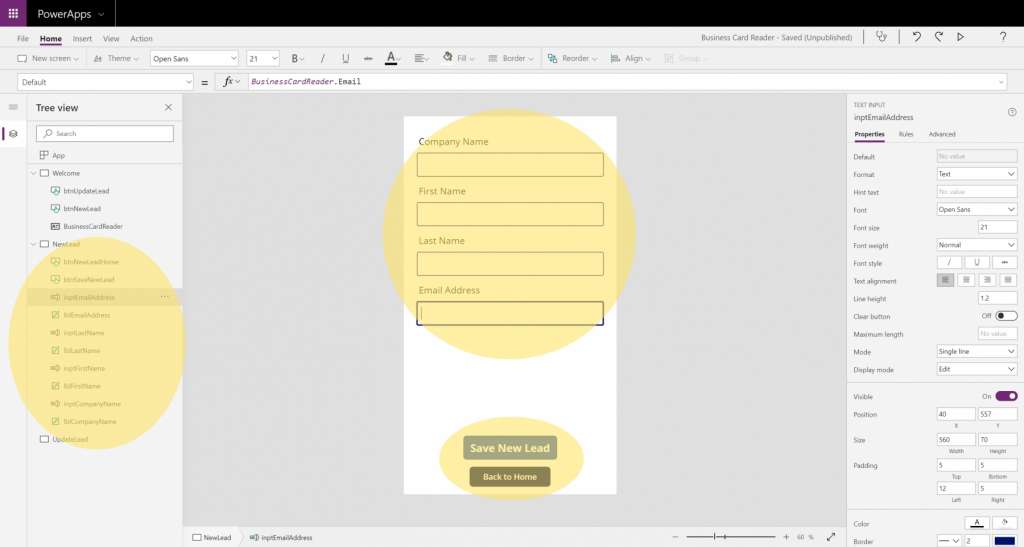
We will use the second screen which I renamed to NewLead. Here, we create a few labels and input boxes for the properties which we want the new Lead to have. Labels can be created by navigating to Insert → Text → Label and input fields can be created by navigating to Insert → Text → Text input. In my case, I use these properties:
- Company Name
- First Name
- Last Name
- Email Address
It's a good idea to use input fields for the properties so the user can edit the information before creating a new Lead.
The [TextInput].default property of each text input has to be mapped to each property of the Business Card Reader AI Module BusinessCardReader [Property]..
In addition, we create two buttons:
- One button will be used for sending information to Microsoft Dynamics 365 in order to create a new Lead record.
- The other button will be used for navigating back to home using the OnSelect property and the Navigate() function.
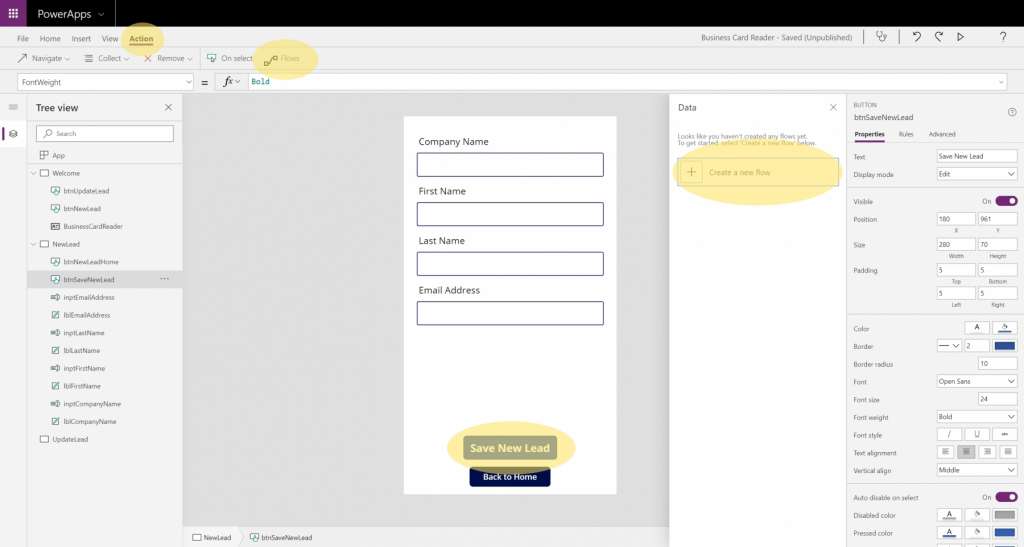
As the next step, we have to create a Microsoft Flow to save the information in Microsoft Dynamics 365 as a new Lead record. Therefore, we use the built-in option by first selecting the corresponsing button. Then, we navigate to Action → Flows → Create a new flow to create a new process automation in Microsoft Flow.
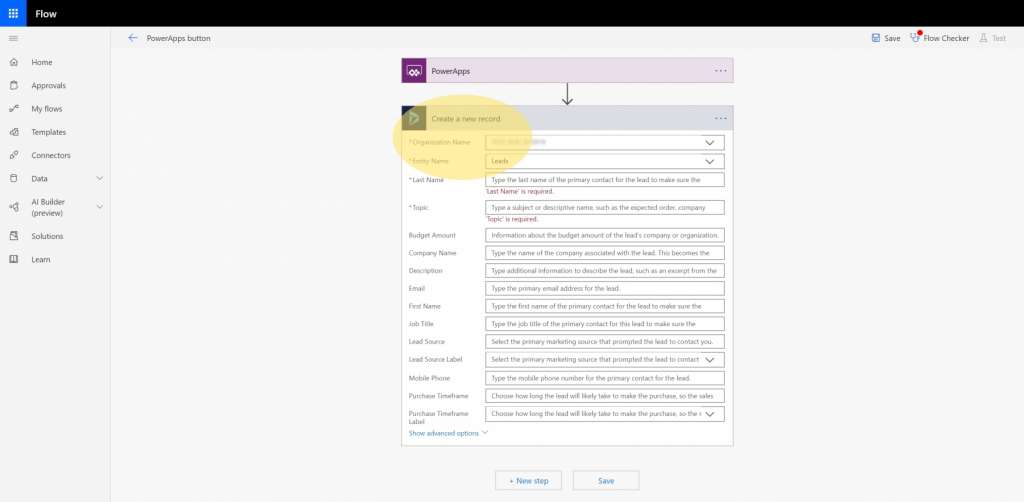
As the next step, create a new action to the Microsoft Flow and search for "Dynamics 365". Then, create the action "Create a new record", select your Organization Name and select "Leads" as the Entity Name.
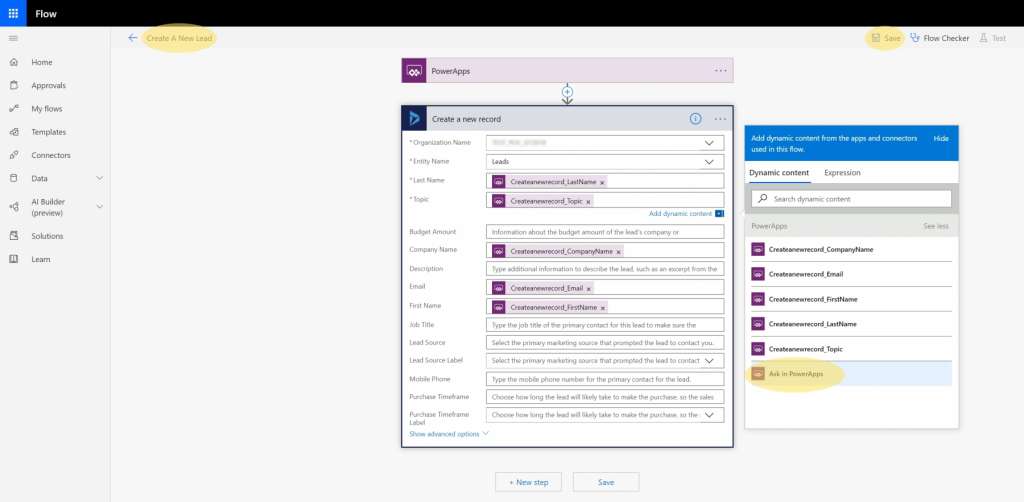
Then, we have to create parameters to submit from PowerApps to Microsoft Flow. Therefore, choose the option "Ask in PowerApps" for each required field. In addition, it's always a good idea to rename the Flow to something useful like "Create A New Lead".
At the end, save the Flow and return to PowerApps.
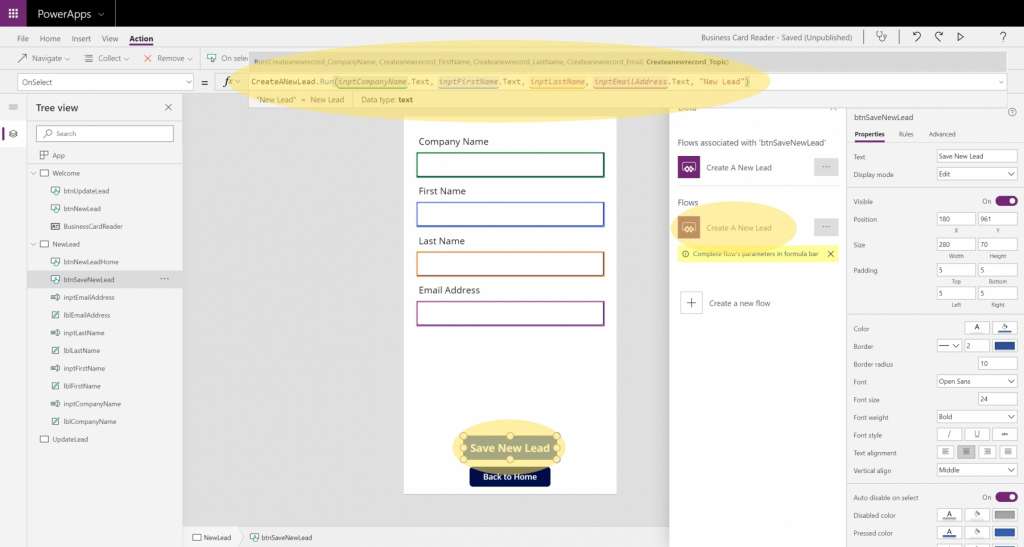
Your just created Flow should appear at the right side panel ready to be selected for the corresponding button. Pass the required parameters inside the parameter list of the Microsoft flow. In this case, I directly use the [TextInput].Text values to cover the case of possible changes of the user. Theoretically, you could also use BusinessCardReader [Property]. as parameters, but then the user wouldn't have the chance to edit the data extracted from the business card.
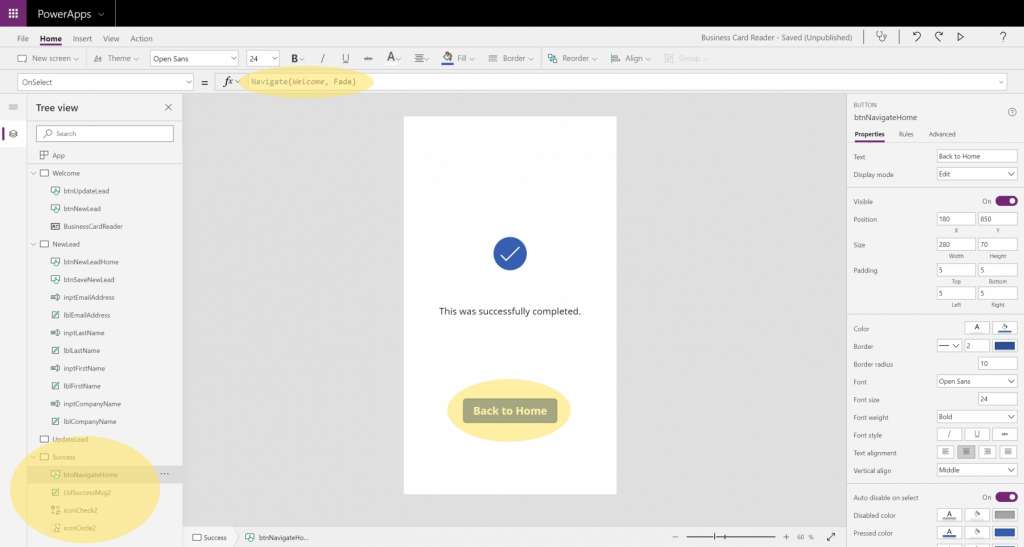
At the end, we can create another screen for the successful operation by navigating to Insert → New screen → Success. We can navigate there right after processing the Flow by adding the Navigate() function seperated with a semicolon:
In addition, I renamed the new screen to Success and I added a button to navigate back home.
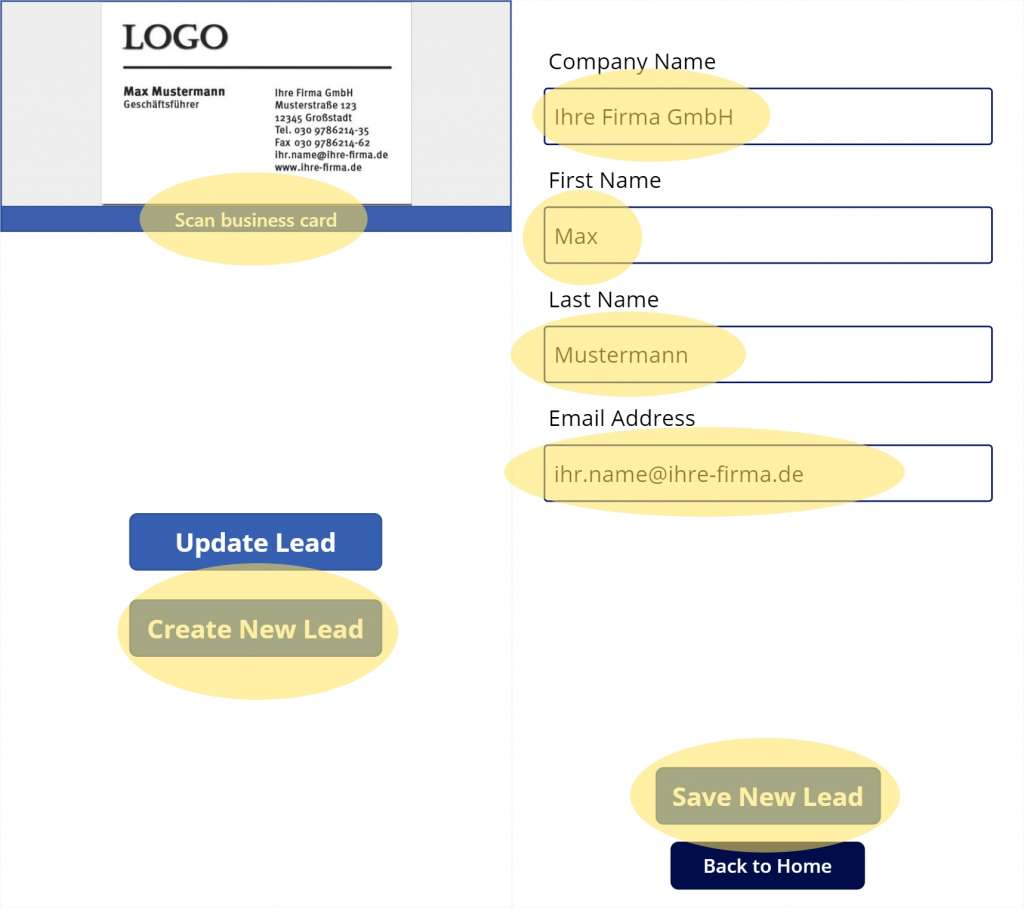
Let's try the application: I uploaded a sample business card found on the internet and selected "Create New Lead" after processing has finished. As you can see, the Business Card Reader AI Module successfully detected the fields. At the end, we can send the information to Microsoft Dynamics 365 using Microsoft Flow by pressing the "Save New Lead" button.
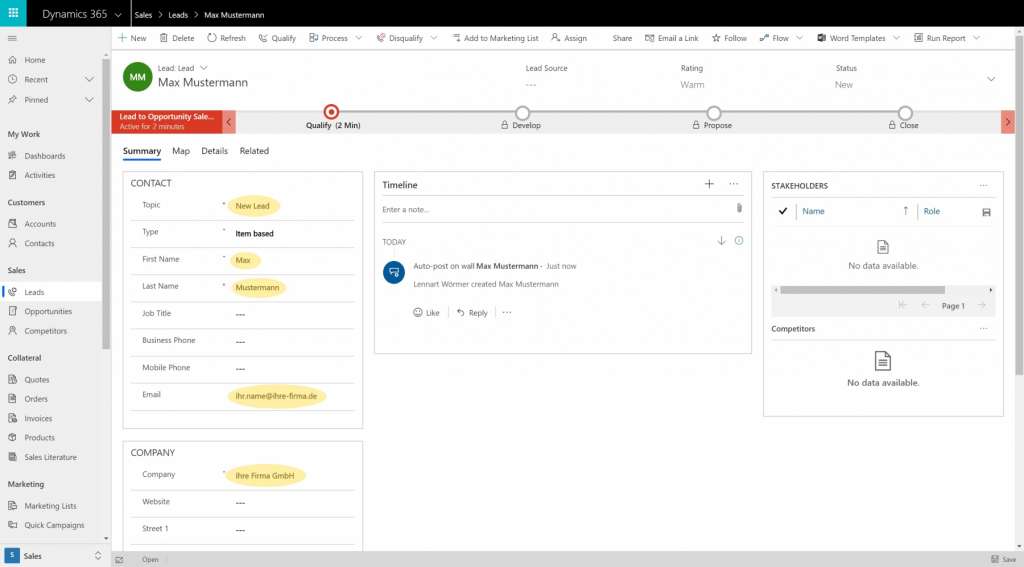
Let's have a look at Dynamics 365: As we triggered the Flow with the button "Save New Lead", a new Lead record has been created:
By the way: You can always analyze your Flows in the Flow Portal and check for possible errors.
Case 2: Updating an existing lead record
As we've successfully finished the first case, we can now explore how it works to update an existing lead record.
Let's create something fancy here and use the extracted information to automatically filter the existing Leads. Therefore, we need to create the following two elements:
- Insert a text input by navigating to Insert → Text → Text input. We will use this as a text field for filtering a list of Lead records.
- Insert a gallery by navigating to Insert → Gallery → Vertical. We will use this element to display the Lead records.
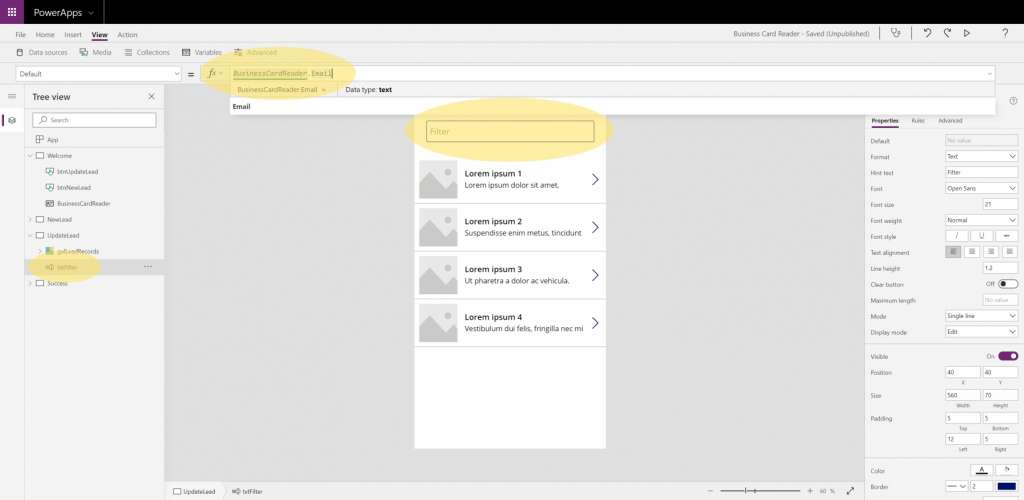
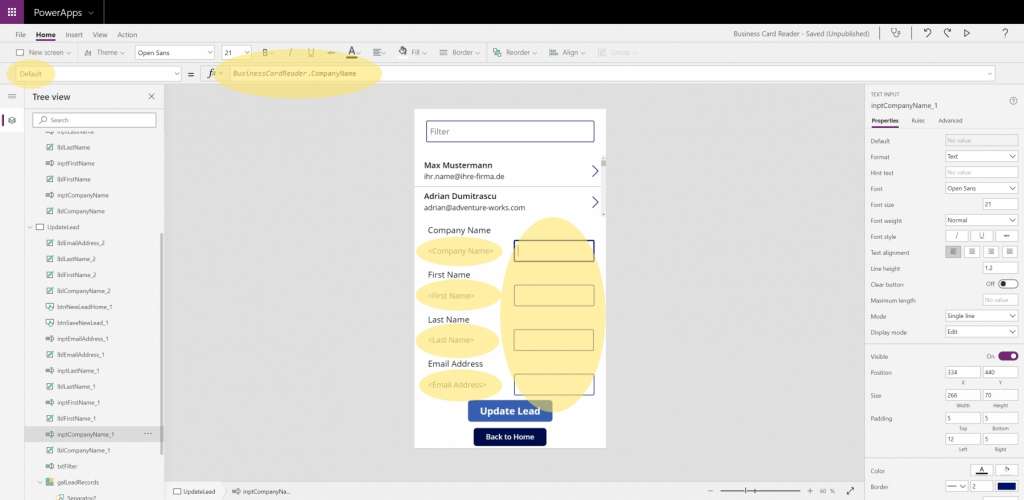
Let's first bind the email address from the business card reader to the text input field for filtering by adding BusinessCardReader.Email to the proper property which is [TextInput].default.
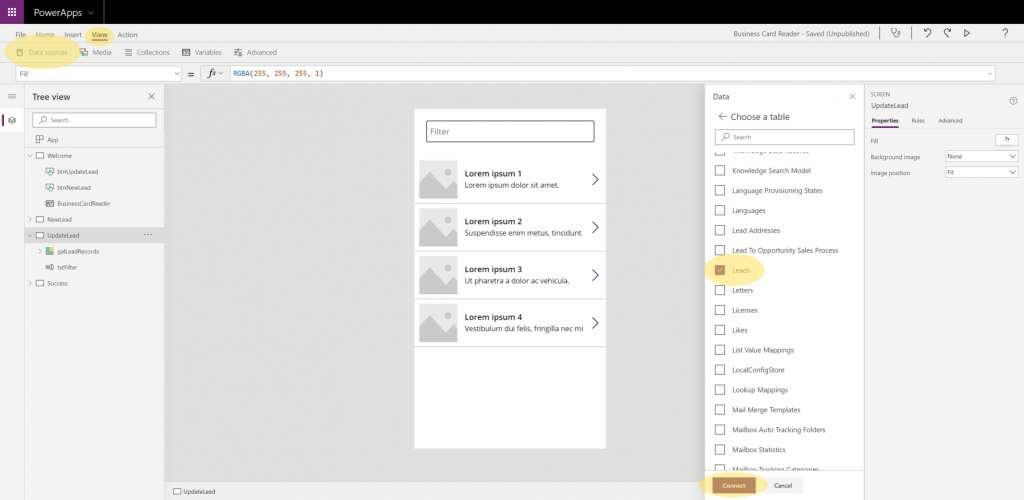
Secondly, let's create a new data source for PowerApps in order to receive the Lead records. We can do this by navigating to View → Data sources → Add data source and then by choosing the Lead entity of your Dynamics 365.
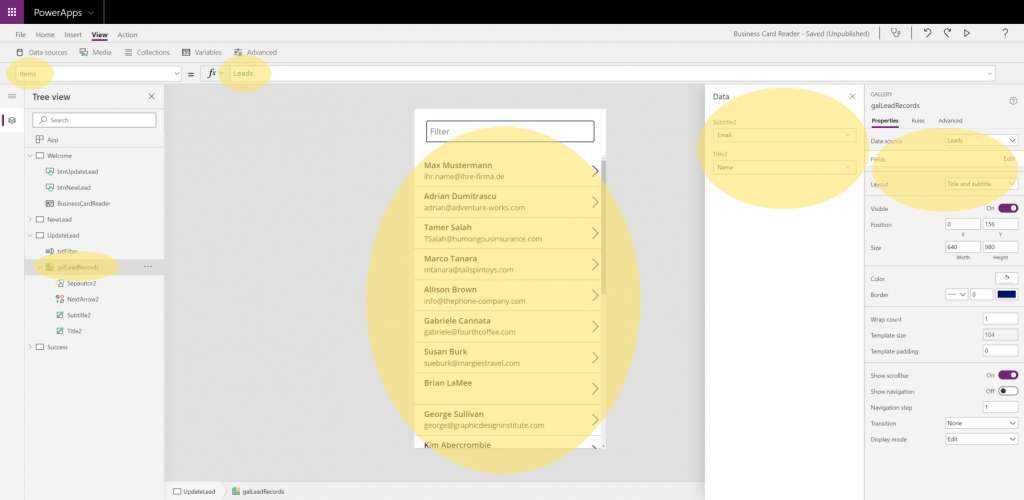
As a third step, let's connect the data source Leads to the inserted gallery by adding the data source to the corresponding property of the gallery which is [Gallery].items. Then, your Lead records will be displayed at the gallery one after each other.
In addition, we can now choose the layout and decide which fields of the Lead record respectively the Lead entity to display at the gallery using the settings at the side panel.
Now and as a final step before we choose the Lead record we'd like to update, we have to implement the filter. We can do that by adding the formula Filter(Leads, txtFilter.Text in Email) to the corresponsing property which in this case is [Gallery].items - again.
So what still needs to happen?
- We have to somehow get information from the currently selected Lead record out of the gallery.
- Then, the user has to choose which information has to be saved (the original information vs. the new information of the business card).
- At the end, we have to create a Flow in order to update the record.
For not using too many variables, screens and extras and in order to keep this tutorial short, let me just shrink the height of the gallery with the lead records. Now, I can place the labels and text inputs (Company Name, First Name, Last Name, Email Address) right below the gallery as we've seen in Case 1. You can simply copy and paste them so they keep the binding to each BusinessCardReader [Property]..
Please keep in mind that it's always a good idea to correctly rename elements in PowerApps as you will otherwise end up with a lot of elements but without any structure. However, in this case, I will ignore some naming conventions from here on since I'm sure you've understood the basic concept so far.
I want the user to both see the currently saved information as well as the newly extracted information. Therefore, I will also shrink the text inputs to half of their size and move them to the right side. On the left side, we will insert some labels by navigating to Insert → Text → Label for each field (Company Name, First Name, Last Name, Email Address). These additional labels will be used for displaying the currently saved information in the selected Lead record.
Additionally, I can use the same buttons but only rename them quickly from "Create New Lead" to "Update Lead".
This may not be the most fancy PowerApp - however, it's functional. Of course, I expect you to create a better-looking application at the end.
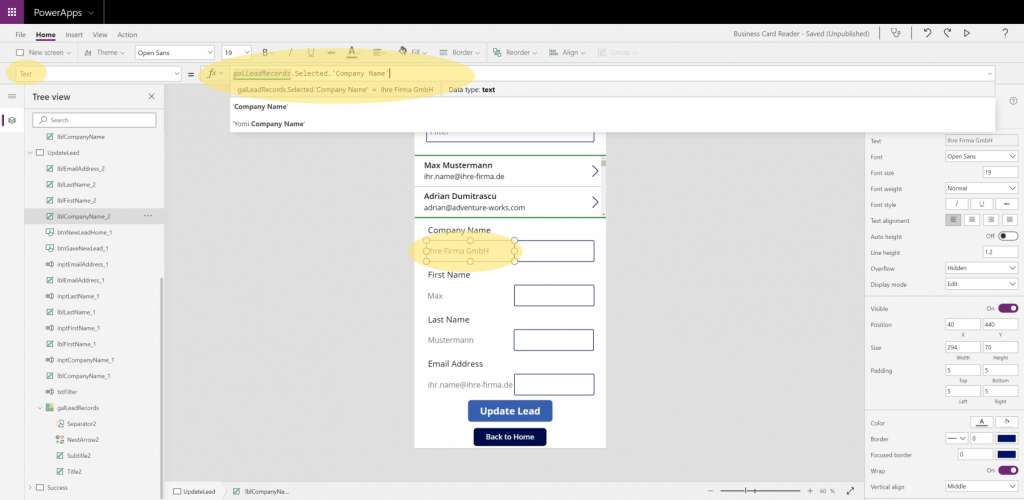
Now, let's use a quick way how to display the Lead information of the currently selected Lead at the labels on the left side of our application. In order to get this done, we can simply change the [Label].text propery to [Gallery].Selected.[Property]. For example, the formula for the first label is galLeadRecords.Selected.'Company Name' - at least in my case with my naming conventions. Let's do this for all four fields:
By the way: The selected Lead record is always the first displayed record by default. However, you can change this by clicking on the arrow to the right in order to select that particular Lead record. This functionality already comes with it.
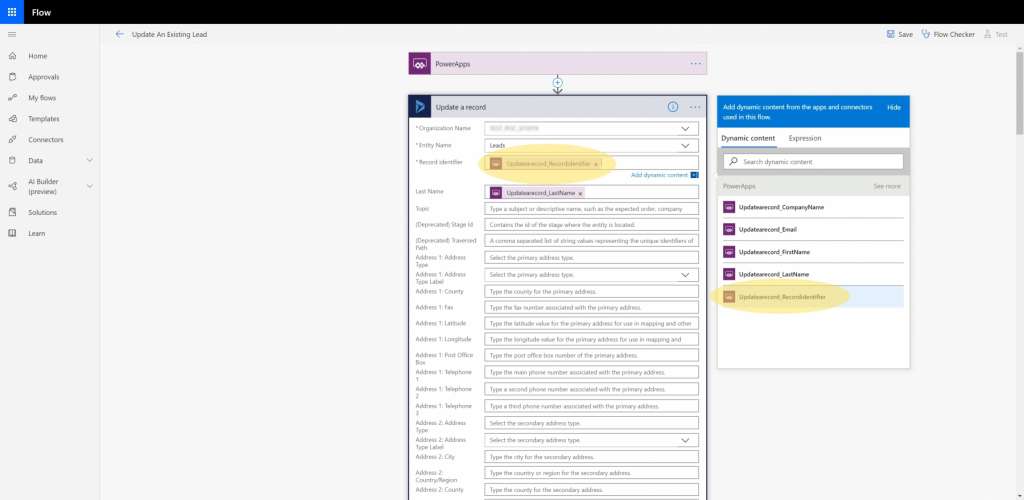
Now and as a last step, we will create a flow as similarly shown in Case 1. Therefore, we select the button "Update Lead" and navigate to Action → Flows → Create a new flow. This time, we choose Update a record as an action for our Dynamics 365 organization and choose the entity "Leads" as previously done in Case 1.
As one of the first fields, Microsoft Flow asks for a "Record Identifier" in order to identify our record which we'd like to update. As for all the other fields (Company Name, First Name, Last Name, Email Address), we can also task PowerApps to provide it for as. We can get this information from the previously inserted gallery with the Lead records inside. And along with all the other parameters, we can also pass this one along from PowerApps to Flow as a parameter.
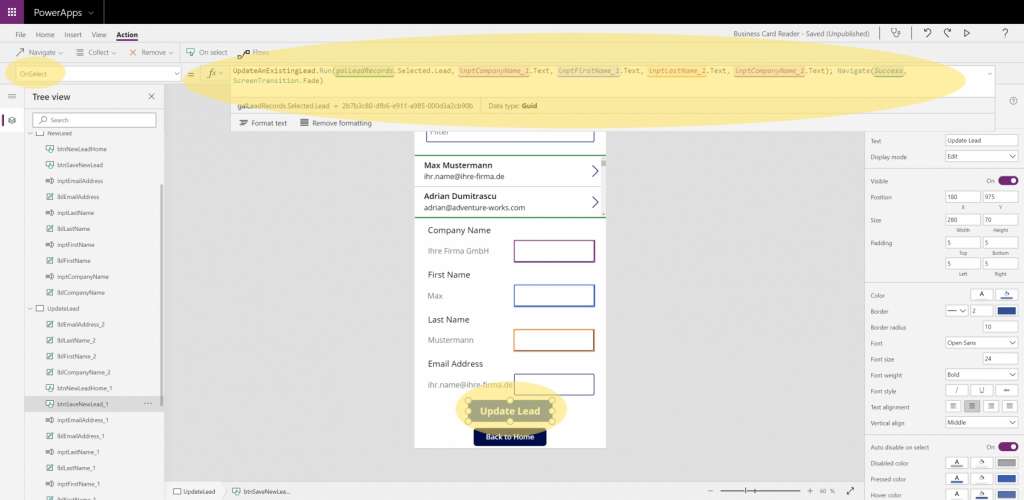
Back in PowerApps, apply the Flow to the "Update Lead" button as shown in Case 1. Then, pass the required and just configured parameters to the Flow and add the Navigate() function to navigate to the Success screen. The Record Identifyer can be extracted from the currently selected Lead record with this formula:
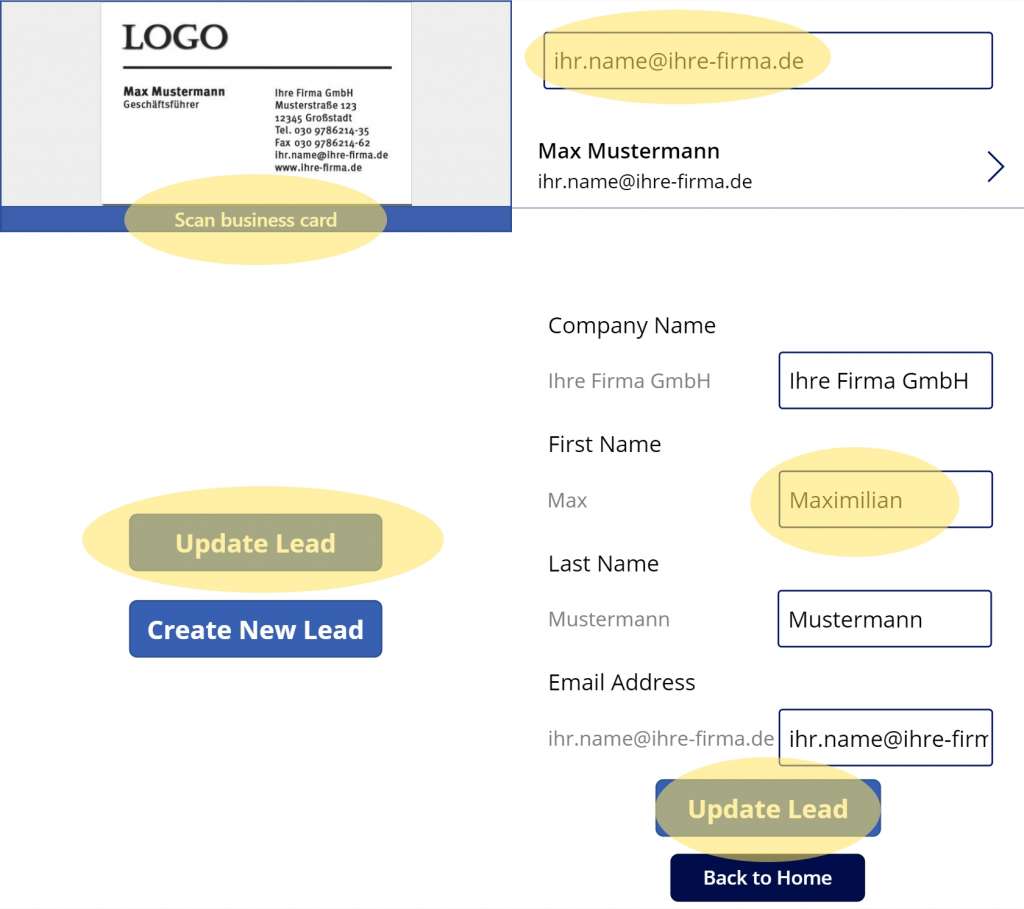
Let's try the application: I used the same business card as in Case 1. PowerApps and the integrated Business Card Reader AI Module analyzed it. Then, I clicked on "Update Lead". As expected, the text input for filtering is filled with the email address extracted from the business card. At this way, we can quickly find the Lead record which we'd probably want to update. Now, in case I wanted to change something, I can do that by simply editing the text inputs on the right side of the application. I did that with the first name which was originally (saved but also extacted) as "Max", but now I wanted to rename this person to "Maximilian". After that, I started the Flow by clicking on "Update Lead".
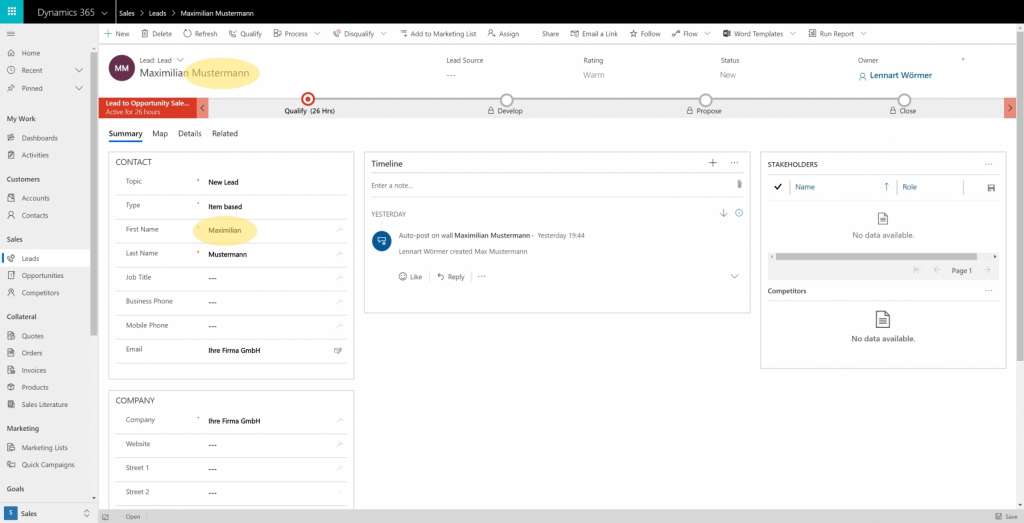
Let's have a look at Dynamics 365 where we find the Lead record updated with the change in the name from "Max" to "Maximilian":
Things to remember
- There will be a native business card scanner coming with the October 2019 update to Dynamics 365. However, there will be some limitations as you will always have more freedom building your own application.
- Microsoft Flow doesn't accept empty parameters. You have to double-check that and implement an error handling before going to production mode.
- The buttons at the first screen of the app shouldn't be selectable before the processing of the business card has been finished.
- A small but fancy and helpful feature is to implement a button which copies an individual information (e.g. email address) from the saved Lead record to the text input right next to it in case you'd like to keep that original piece of information when updating a Lead record.
Please feel free to submit a comment in case you have any question about PowerApps, Dynamics and the Business Card Reader AI Module. Also share your experiences with PowerApps and the AI Builder!
Questions & Answers
Which technologies are being used?
The Business Card Reader is based on PowerApps, the AI Builder as well as Flow which are all part of the Power Platform. Additionally, Dynamics 365 as a CRM system is used in this case.
Can you both update and create new leads?
Yes, that's possible with the Business Card Reader presented in this article.
Why not use the built-in functionality in Dynamics 365?
Dynamics 365 offers an integrated Business Card Reader which was introduced with the October 2019 update. It's a great choice for simple tasks. However, this article provides you with a template how to customize your individual Business Card Reader which you can technically also connect to several other systems using Microsoft Flow.




Leave a Reply