
In this article, I will show you how to build offline capability for your Canvas Apps (Power Apps) in a step-by-step tutorial. There are a few formulas and steps required be know. After being aware of them, it’s a pretty straight-forward process which I demonstrate you with the scenario of an appointment application. This article covers every aspect that you need to consider to make your app offline capable. Let’s go and explore!
The Basics
The need of the Power Apps app
Before building Canvas Apps with an offline capability, be aware that offline capabilities are only working within the Power Apps app that works as a framework. Therefore, you need to install the Power Apps app first.
After you’ve successfully finished the installation, simply login with your Microsoft Account credentials and your app will appear.
However, the need of the Power Apps app also makes clear that offline capabilities are not working within a web browser.
Useful Formulas
Although Microsoft promoted the Power Platform as a ‚low code, no code platform‘, we will work with some code here. There are a few formulas that are important to understand for creating the desired offline scenario.
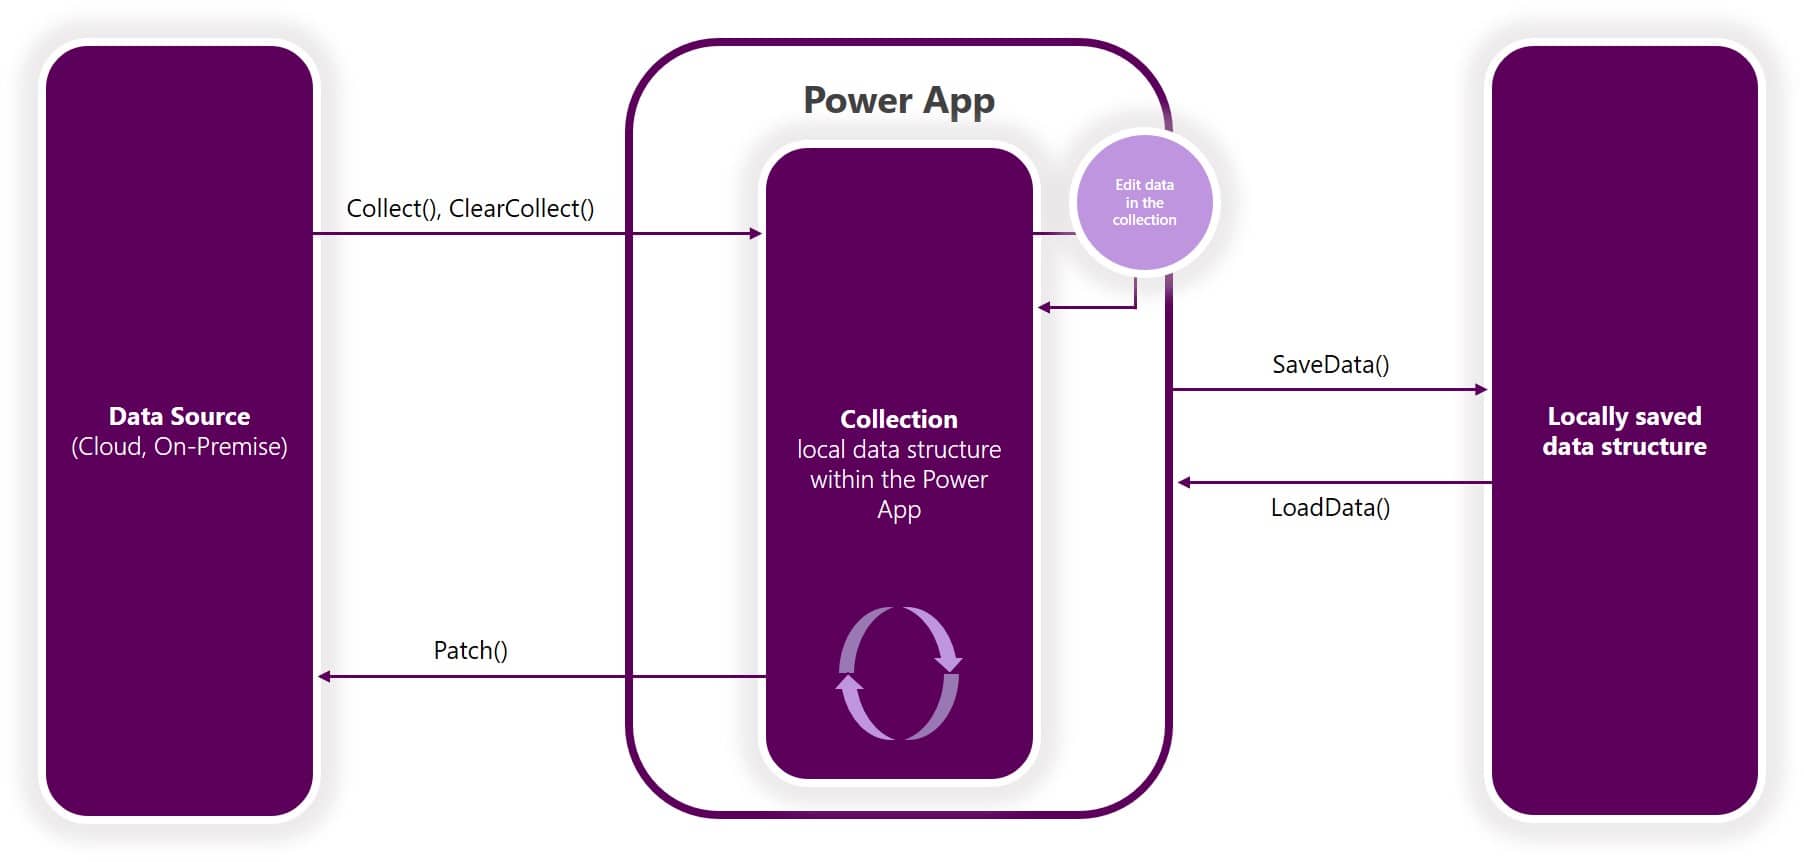
- Use Collect() to collect/create records to your collection (a database within your Power App). Use Clear() to clear your collection. And if you’d like to clear and then collect/create new records, use ClearCollect().
- When created a collection, use AddColumns() to add a column/field to your collection. Removing unnecessary columns/fields work with DropColumns(). And if you’d like to rename a column/field, simply use the RenameColumns() formula.
- For looping through records of collections or other data sources, use the formula ForAll() which is equivalent to for each statements you may know from other programming languages. Within the loop, you can modify all records of the data source.
- When you’re about to build offline capability, the formula SaveData() will be one key feature: Use it to store a collection to your device (within the Power Apps app).
- The formula LoadData() works in team play with the SaveData() formula. Where SaveData() stores data, LoadData() reads out data again.
- Is the user online or offline? Check this information with Connection.Connected which returns a boolean value.
- Whether you’d like to update existing or create new records, the formula Patch() is the one to work with. It works with both collections and other data sources.
Tutorial
Scenario „Appointment App“
The scenario which we’re going to use in this tutorial will consist of the following components respectively elements:
- Canvas App (Power App)
- SharePoint (Data Source)
We’re going to work with an already connected SharePoint list called Appointments.
Saving and loading data
When working with an app that includes offline capability, it’s recommended to not directly work with the data source but with collections. That gives us more flexibility as we can use collections when we’re both online and offline. Collections are locally stored data structures that – in most cases – can be used equally to regular data sources. So again, we do always work with the collection as a data source from now on.
It’s a good idea to put some code into the App.OnStart property which initially loads some data. Besides variables for users, pixels and colors, I highly recommend to also initially load the data of your data source into a collection. Use ClearCollect() to perform this action with two important parameters:
- Collection: name of your collection which, according to naming conventions, starts with col
- Item(s): records that you’d like to collect into your collection
So our formula could look something like this:
ClearCollect(
   colAppointments,
   Appointments
)
Keep in mind that you could technically filter the Appointments SharePoint list already here in the parameter.
It’s a good idea to use ClearCollect() instad of Collect() on the App.OnStart property, as this code will run only the first time when the user starts the application. Additionally and for testing purposes, using ClearCollect() is also useful as it won’t generate duplicates in your collection.
If you’d like to make batch modifications to your collection colAppointments, you could modify records using the ForAll() formula.
At the end, you can begin writing some code to save the collection colAppointments locally. Use the formula SaveData() to save it locally with the following parameters:
- Collection: name of your collection
- Name: recommended to keep it the same as the name of your collection
At the end, the code should look something like this:
SaveData(
   colAppointments,
   'colAppointments'
)
Additionally, we also need to consider the opposite case: How can we load the locally collection colAppointments from the locally saved data structure when we’re offline? Well, the formula LoadData() is our solution here! Use it with the following parameters:
- Collection: collection in which the locally saved data structure should be loaded into
- Name: name of the locally saved collection
- IgnoreNonexistentFile: true when no error message should appear when the locally saved collection has not been found
Our formula should look something like this now:
LoadData(
   colAppointments,
   'colAppointments',
   true
)
A schematic representation of the scenario is as follows:
Connectivity handling
However, now, we’ve created two ways of how to store records in the collection colAppointments – one directly from SharePoint using ClearCollect() and the other from our locally saved data structure using LoadData(). We have to differenciate if the user is online or offline. We can so by using Connection.Connected. It returns true if the user is online and false otherwise.
So we could use some code like this in the App.OnStart property:
If(
   Connection.Connected,
   ClearCollect(colAppointments, Appointments),
   LoadData(colAppointments, 'colAppointments', true)
)
So where to put the SaveData() formula? Well, that’s a bit more tricky as you have to use that formula after every modification made on a record in the colAppointments collection. That’s something you have to do manually. Additionally, I recommend to only use SaveData() when the user is actually offline. So at some point, we should use this piece of code:
If(
   !Connection.Connected,
   SaveData(colAppointments, 'colAppointments')
)
Tracking changes
In order to track changes on each record in our colAppointments collection, we should use a new column which I will name changed. It’s a boolean field. It will be set to true as soon as we’ve some changes to the specific record.
In order to create the column for our local collection, we use the AddColumns() formula with the following parameters:
- Table: our collection
- ColumnName(s): name of the new column
- Formula(s): use false to create a boolean field
Our final formula should look like this:
AddColumns(
   colAppointments,
   'changed',
   false
)
It should be performed right after the ClearCollect() formula on the App.OnStart property.
Editing existing records
As stated at the beginning, we do only work with the collection colAppointments when modifying records or adding new records. Unfortunately, so far, it’s not possible to use Forms to edit collection as you could do with regular data sources. Therefore, we will take advantage of the Patch() formula.
Let’s day we wanted to update an existing record that we have previously selected in a gallery which I will call galAppointments. Then, we can use the following formula to patch respectively update the currently selected record:
Patch(
   colAppointments,
   galAppointments.Selected,
   {field_name: new_field_value, changed: true}
)
The Patch() formula requires the following parameters:
- DataSource: data source where to find the record to update
- BaseRecord: record to be changed which can be selected through a gallery (as shown above) or through other statements like First()
- ChangedRecordTable: fields to be changed/updated
Remember to change the property changed to true as we want to have an indication of which record has been changed to later sync it back to the SharePoint list Appointments.
Adding new records
When adding new records, we can also use the Patch() formula. We will just change the value of the second parameter to be Defaults(data source) which will result in the following code:
Patch(
   colAppointments,
   Defaults(colAppointments),
   {field_name: new_field_value, changed: true}
)
Same here: Remember to set changed to true as we want to sync this record back to SharePoint later.
Syncing existing and modified records
We’re also using the Patch() formula for syncing existing records from colAppointments back to the SharePoint list Appointments. Before we write the code for that, let’s take a breath and think about what we need to consider:
- We should only sync records when we’re online. So we need to check with Connection.Connected.
- We should only sync records which have been changed. So we need to filter the collection colAppointments.
- We have to refer to the correct record on SharePoint to update. Therefore, we need to use the field ID which is a standard field of SharePoint lists and therefore, it’s been collected in out collection colAppointments already (as we collect every field).
Let’s see what the code could look like:
If(
   Connection.Connected;
   ForAll(
      Filter(
         colAppointments,
         changed = true.
         Not(
            IsBlank(ID)
         )
      );
      Patch(
         Appointments,
         First(
            Filter(
               Appointments,
               ID = ID
            )
         ),
         {field_name_sharepoint: field_name_collection}
      )
   )
)
With Not(IsBlank(ID)), we make sure to only sync records that do already have a SharePoint ID.
With ID = ID, we retrieve the correct and unique record from SharePoint which we’d like to update. This statement can be confusing and might not always work probably! Therefore, I highly recommend to rename the column name of your local collection from ID to SharePointID. You can do that with the following piece of code:
RenameColumns(
   colAppointments,
   'ID',
   'SharePointID'
)
Renaming the column should be done directly after collecting the data from the SharePoint list initially. Therefore, this piece of code has to be added right after the ClearCollect() statement stated quite a bit above.
So the new and updated piece of code looks like this:
If(
   Connection.Connected;
   ForAll(
      Filter(
         colAppointments,
         changed = true.
         Not(
            IsBlank(SharePointID)
         )
      );
      Patch(
         Appointments,
         First(
            Filter(
               Appointments,
               ID = SharePointID
            )
         ),
         {field_name_sharepoint: field_name_collection}
      )
   )
)
After a successful sync, we have to set changed back to false or we have to ClearCollect() the data from SharePoint as we don’t want to update records that actually haven’t been updated. As this can be done in either ways, I will give you the chance to try out some simple coding for solving this challenge. Just make sure to remember to implement this one.
Syncing new records
Syncing newly created record in our collection colAppointments works similar to what we’ve seen for existing records. It’s a bit more simple, actually. Let’s have a look at the code first:
If(
   Connection.Connected;
   ForAll(
      Filter(
         colAppointments,
         changed = true,
         IsBlank(SharePointID)
      );
      Patch(
         Appointments,
         Defaults(Appointments),
         {field_name_sharepoint: field_name_collection}
      )
   )
)
A quick reminder: Here, we want the SharePointID to be blank as we do create new records here in SharePoint and SharePoint handles the IDs. Additionally, we use the Defaults() formula to create new records similar to what we’ve seen before when creating new records for our collection colAppointments.
Automatically sync changes
Syncing changes manually after each modification on the collection can be quite complex to implement as there will be a high redundancy of code. Therefore, we can take advantage of the timer control in Canvas Apps. The property OnTimerEnd gives us the chance to place our code in there.
Additionally, set the Repeat and Duration properties to whatever interval you’d like to synch changes back to SharePoint.
Limitations
Currently, it’s not possible to use the Forms control for collections. They’re only available to use for regular data sources. This circumstance results in a bit more code using the Patch() formula. However, through writing the code by yourself, you also get the amazing change to learn more about Power Apps.
Conclusion
Although Power Apps is promoted as a low code and no code platform, there are ways to also use complex code within Power Apps. The code written in this article may not be very complex, but still, it’s definitely something that requires a larger understanding than citizen developers.
Offline capabilities are great additions to your existing Power Apps. It’s useful when there is no phone signal at some paces at the world or if a secure network connection is not given at some places you travel. Although it might be an initial investment adding offline capabilities, it’s definitely worth it to try it out. Learning makes the master. Go forward and spread the greatness of Power Apps. Let’s use #LessCodeMorePower.
Questions & Answers
Can I build offline capability for Power Apps?
Yes, you can do that with Canvas Apps within the framework of the Power Apps app on your phone.
Can I run Power Apps offline?
Yes, you can do that. This article shows you how you can.
How does Power Apps save data locally?
Power Apps uses collections (locally stored data structures) which can be saved and loaded. The Power Apps app is required.
Which Power Fx formulas do I need to build offline capabilty?
For Canvas Apps, use SaveData() and LoadData() for saving and loading collections. However, there are a few more steps necessary which are all described in my tutorial.
Schreibe einen Kommentar