
There are many users suffering from annoying coil whine on the Dell XPS 13 and XPS 15 series (and others as well). Dell has not listened to its customers for many years and the coil whine problem still exists on their newest premium products. However, there are a few tricks reduing coil whine and making the XPS series great again. Same time, the performance can be enhanced.
Disclaimer
This process is straight forward and considered safe, but if you end up configuring the wrong thing, you could damage your PC. So do this exclusively at your own risk.
Thermal Optimization
Instructions
From my personal experience as well as other users on the internet, a manual thermal optimization for the Dell XPS series reduces the coil whine recognizable. Two different steps can be taken to improve the thermal behavior of our lovely XPS notebooks:
- replacing thermal paste
- adding thermal pads
The thermal paste’s task is to conduct heat from the CPU (Central Processing Unit) and the GPU (Graphics Processing Unit) to its cooling unit. There are many reports on the internet that thermal paste is not placed correctly on the CPU/GPU as well as bad quality being used. This is not only a problem of Dell but many more companies.
Thermal pads are special pads conducting heat whereever they touch. Placing them on the internal heat pipe (going from CPU/GPU to the fan(s) of your notebook) will result in a permanent connection to the back cover of the notebook. Since that’s built from aluminum, it can be used as a very big and efficient heat conductor.
Both repasting and changing thermal pads require opening the notebook which is not a big deal and warranty will not expire! Luckily, XPS series are built in mind to open them and to quickly change parts and fix problems. You will need a T5 hex screwdriver, small Phillips head screwdriver as well as a plastic pry tool to carefully pry the panel off after the screws are removed.
Repasting should be done before applying thermal pads. Please take care not to bend the heat pipe while cleaning it and removing the old thermal paste. Alcohol will make some magic here.
Applying thermal pads is relatively easy as well. Just cut them into the right size and apply them on the heat pipe. I used thermal pads with a thickness of 1.5mm on the 2017 XPS 13 and thermal pads with a thickness of 2.5mm for the 2018 XPS 15. On a few spots (e.g. both sides of the CPU/GPU), I was able to stick several layers of thermal pads on top of each other to make sure that they all have a equal height.
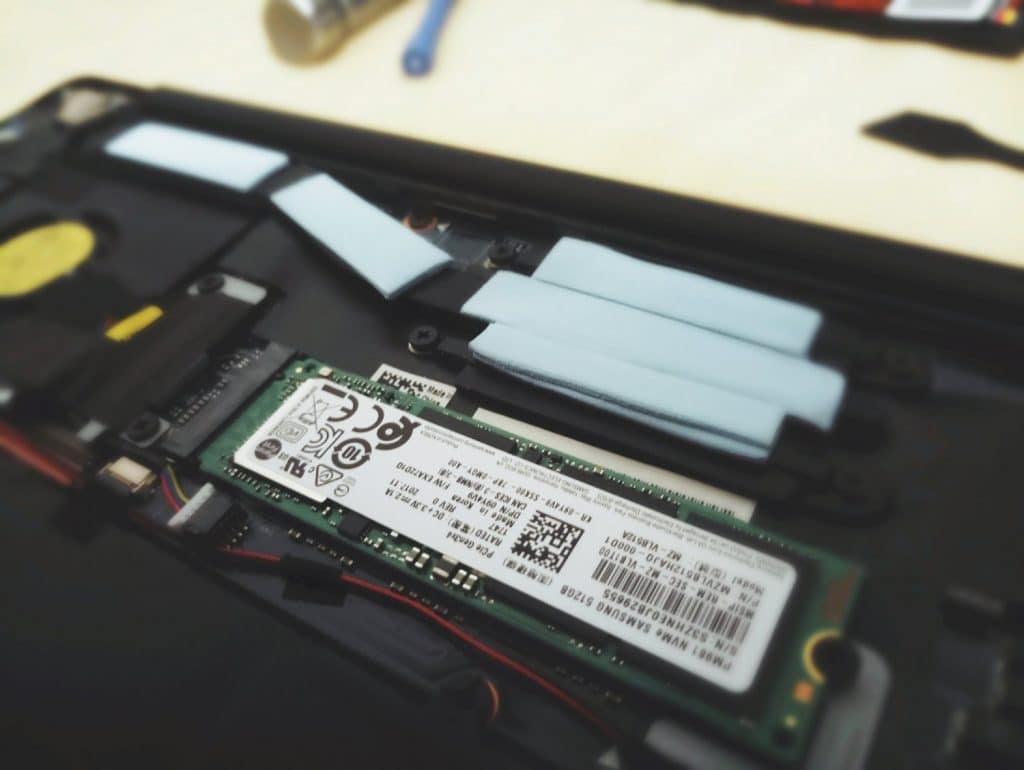
Make sure to probably close the back cover so that the thermal pads touch it and the heat can be conducted nicely.
Advantages
- There is a pretty good chance of a permanent and recognizable reduction of coil whine.
- There is no more CPU/GPU throtteling which brings you a performance boost.
- The fan doesn’t kick in anymore (at least with both my 2017 XPS 13 and 2018 XPS 15) which results in a reduction of noise.
- The low(er) fan usage result in a longer battery life.
- The system temperature dropped for about 10 degrees (2018 XPS 15) and 15 degrees (2017 XPS 13).
Disadvantages & Risks
- The rubber feet on the back cover may fall of after a while caused by the extensive heat of the back cover which they’re fixed on. The first generation of the Microsoft Surface Book had quite the same problem which could be solved by manually fixing them with thermal resistant super glue.
Update: I’ve modified my Dell XPS 13 9360 from January 2018 with thermal pads and so far, I can’t detect any damage on the rubber feet. - The back cover will become significantly warmer than before. This might be uncomfortable in summer – though it may be a great heating in winter.
Recommendations
- Thermal Grizzly Kryonaut (1 gramm is enough for repasting one notebook)
- Arctic Thermal Pads 1.5mm (5cm x 5cm is just enough for one XPS notebook)
Undervolting CPU/GPU
Instructions
Another step reducing the thermal heat is to undervolt the CPU and GPU which results in less thermal warmth. Why does it work? Well, CPUs/GPUs operate at a very specific voltage. Given the colossal assembly line at which these processors roll out, some processor models are tested at voltages higher than they really need.
Please keep in mind that every CPU/GPU is individual and has its individual (minimum) voltage.
Advantages
- There is a pretty good chance of a permanent and recognizable reduction of coil whine.
- The system temperature dropped for about 10 degrees.
- For more advanages, have a look at chapter one.
Disadvantages & Risks
You may end up with an unstable system. Therefore, please take care and carefully watch the linked guide.
Recommendations
- Intel XTU (Intel Extreme Tuning Utility)
- ThrottleStop
Isolating Speaker Cables
Some users report coil whine cracking sounds coming from the speakers. A possible solution can be to simply isolate the speaker cables from a certain screw. Therefore, opening your XPS is necessary (see chapter one). A video on YouTube explains which cable to isolate.
Possible Solutions
There are more possible solutions that work for some users (but not all of them):
- installing the lastest Intel HD Graphics Driver manually
- installing the lastest Realtek Audio Driver manually
- installing the newest BIOS (generally recommended)
- switching to Linux-based operating system (probably not an option for most of you)
- swapping the mainboard (by a Dell technician)
- make the notebook go to energy saving mode and wake up again
- disabling C-state in BIOS
- removing the middle screw of back panel with XPS 13 93xx and XPS 15 95xx ones
If none of these tipps are fixing the problem or at least reducing the coil whine recognizably, then I recommend to contact Dell and ask for a replacement.
Do you know any other method of solving the coil whine issue? I’d be happy to hear form you!
Questions & Answers
How do I stop coil whine on my Dell XPS laptop?
Some Dell XPS models suffer from coil whine. Usually, you can’t completely fix it, but you can significantly reduce it. Possible solutions are undervolting and better thermals by thermal paste and thermal pads.
How can I improve thermals of my Dell XPS laptop?
This really depends on the model. Some models go along very well with new thermal paste and thermal pads which connect the internal hardware with the aluminum backplate. Other models, however, aren’t very suitable. I suggest you to search on Reddit for solutions and experiences of others. Undervolting is a common measure, too.
Schreibe einen Kommentar